 Ivan Cernja
How to Migrate from Heroku to AWS
Move from Heroku to your own AWS account with a simple deployment workflow

Heroku offered simple deployments: push code, get a running app. With Heroku now in maintenance mode after 19 years, teams need to migrate. The traditional path to AWS means learning Terraform or CloudFormation, writing Dockerfiles, configuring VPCs, and managing IAM roles, which is a lot of operational overhead to take on.
This guide takes a different approach: migrating to your own AWS account using Encore and Encore Cloud. Encore is an open-source TypeScript backend framework (11k+ GitHub stars) where you define infrastructure as type-safe objects in your code: databases, Pub/Sub, cron jobs, object storage. Encore Cloud then provisions these resources in your AWS account using managed services like RDS, SQS, and S3.
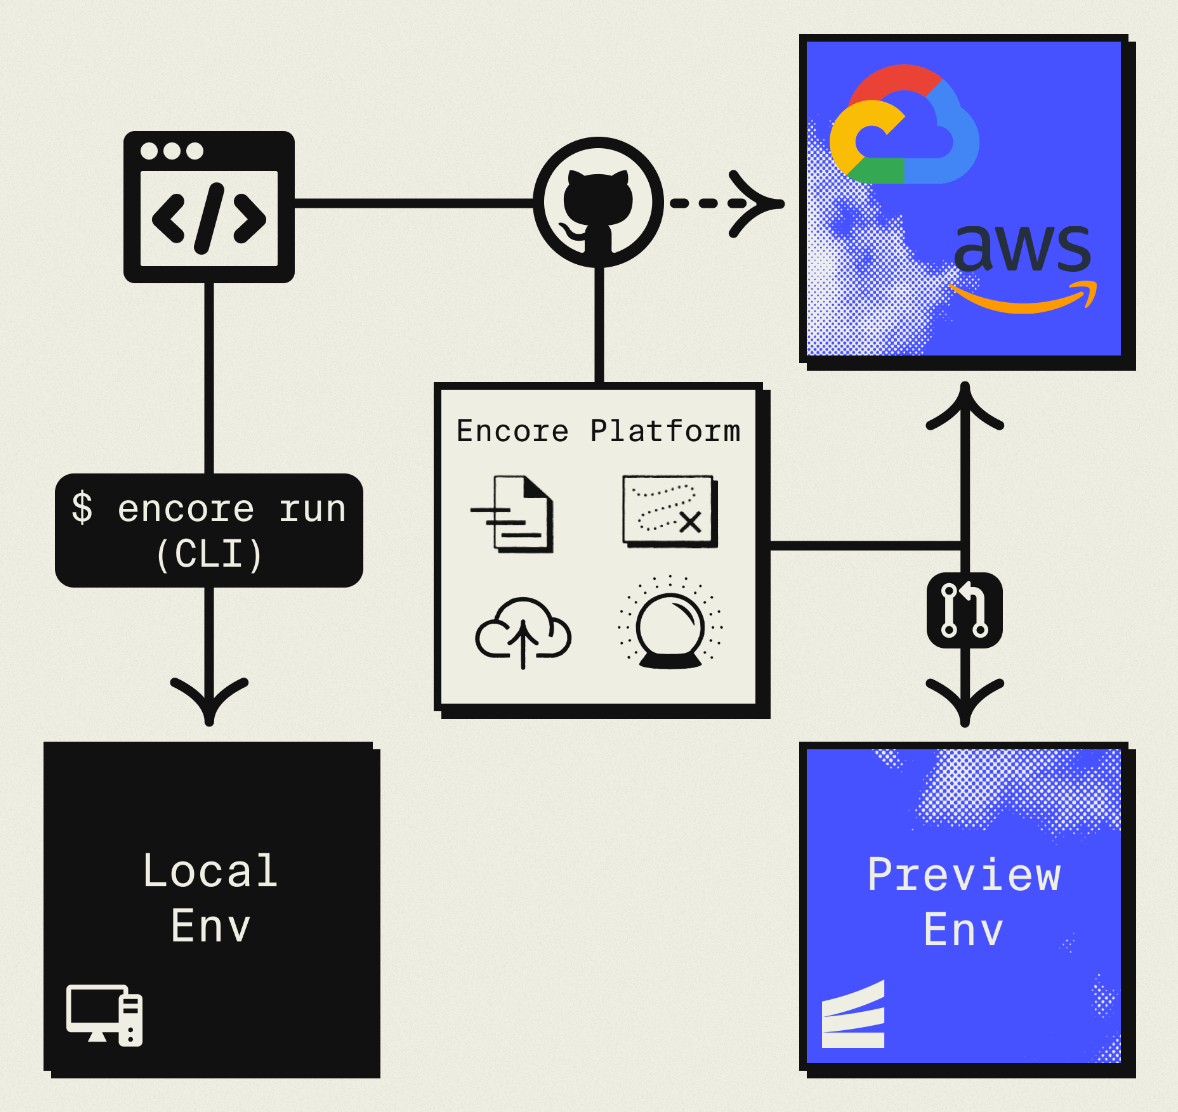
The result is AWS infrastructure you own and control, with a simple deployment workflow: push code, get a deployment. No Terraform to learn, no YAML to maintain. Companies like Groupon already use this approach to power their backends at scale.
What You're Migrating
| Heroku Component | AWS Equivalent (via Encore) |
|---|---|
| Web Dynos | Fargate |
| Worker Dynos | Pub/Sub subscribers (SNS/SQS) |
| Heroku Postgres | Amazon RDS |
| Heroku Redis | Pub/Sub (for queues) or self-managed Redis |
| Heroku Scheduler | CloudWatch Events + Fargate |
| Config Vars | Encore Secrets |
| Pipelines | Encore Environments |
| Review Apps | Preview Environments |
| Add-ons | AWS Services |
The concepts map directly: Heroku dynos become Fargate tasks, Postgres stays Postgres (just on RDS), and worker processes become Pub/Sub subscribers. The biggest shift is that background job patterns change from Redis-backed queues to managed message queues.
Why Teams Migrate from Heroku to AWS
On Heroku, you get a URL but not much control over what's behind it. On AWS, you control VPCs, security groups, IAM roles, and can integrate with your existing infrastructure. AWS services like SQS, DynamoDB, Lambda, and CloudFront are local to your account rather than accessed over the public internet.
For regulated industries (HIPAA, SOC 2, PCI), infrastructure needs to live in accounts with specific audit and access controls, which Heroku's shared platform doesn't support. Owning your infrastructure also means your deployment isn't dependent on a third-party platform's roadmap or business decisions.
What Encore Handles For You
When you deploy to AWS through Encore Cloud, every resource gets production defaults: private VPC placement, least-privilege IAM roles, encryption at rest, automated backups where applicable, and CloudWatch logging. You don't configure this per resource, it's automatic.
Encore follows AWS best practices and gives you guardrails so you can review infrastructure changes before they're applied, and everything runs in your own AWS account so you maintain full control.
import { SQLDatabase } from "encore.dev/storage/sqldb";
import { Bucket } from "encore.dev/storage/objects";
import { Topic } from "encore.dev/pubsub";
import { CronJob } from "encore.dev/cron";

const db = new SQLDatabase("main", { migrations: "./migrations" });
const uploads = new Bucket("uploads", { versioned: false });
const events = new Topic<OrderEvent>("events", { deliveryGuarantee: "at-least-once" });
const _ = new CronJob("daily-cleanup", { schedule: "0 0 * * *", endpoint: cleanup });
This provisions RDS, S3, SNS/SQS, and CloudWatch Events with proper networking, IAM, and monitoring. You write TypeScript or Go, Encore handles the Terraform. The only Encore-specific parts are the import statements. Your business logic is standard TypeScript, so you're not locked in. For teams using AI agents like Cursor or Claude Code, this means infrastructure doesn't drift from your application logic.
Encore Cloud visualizes how your services connect, including Pub/Sub topics, cron jobs, and database dependencies:
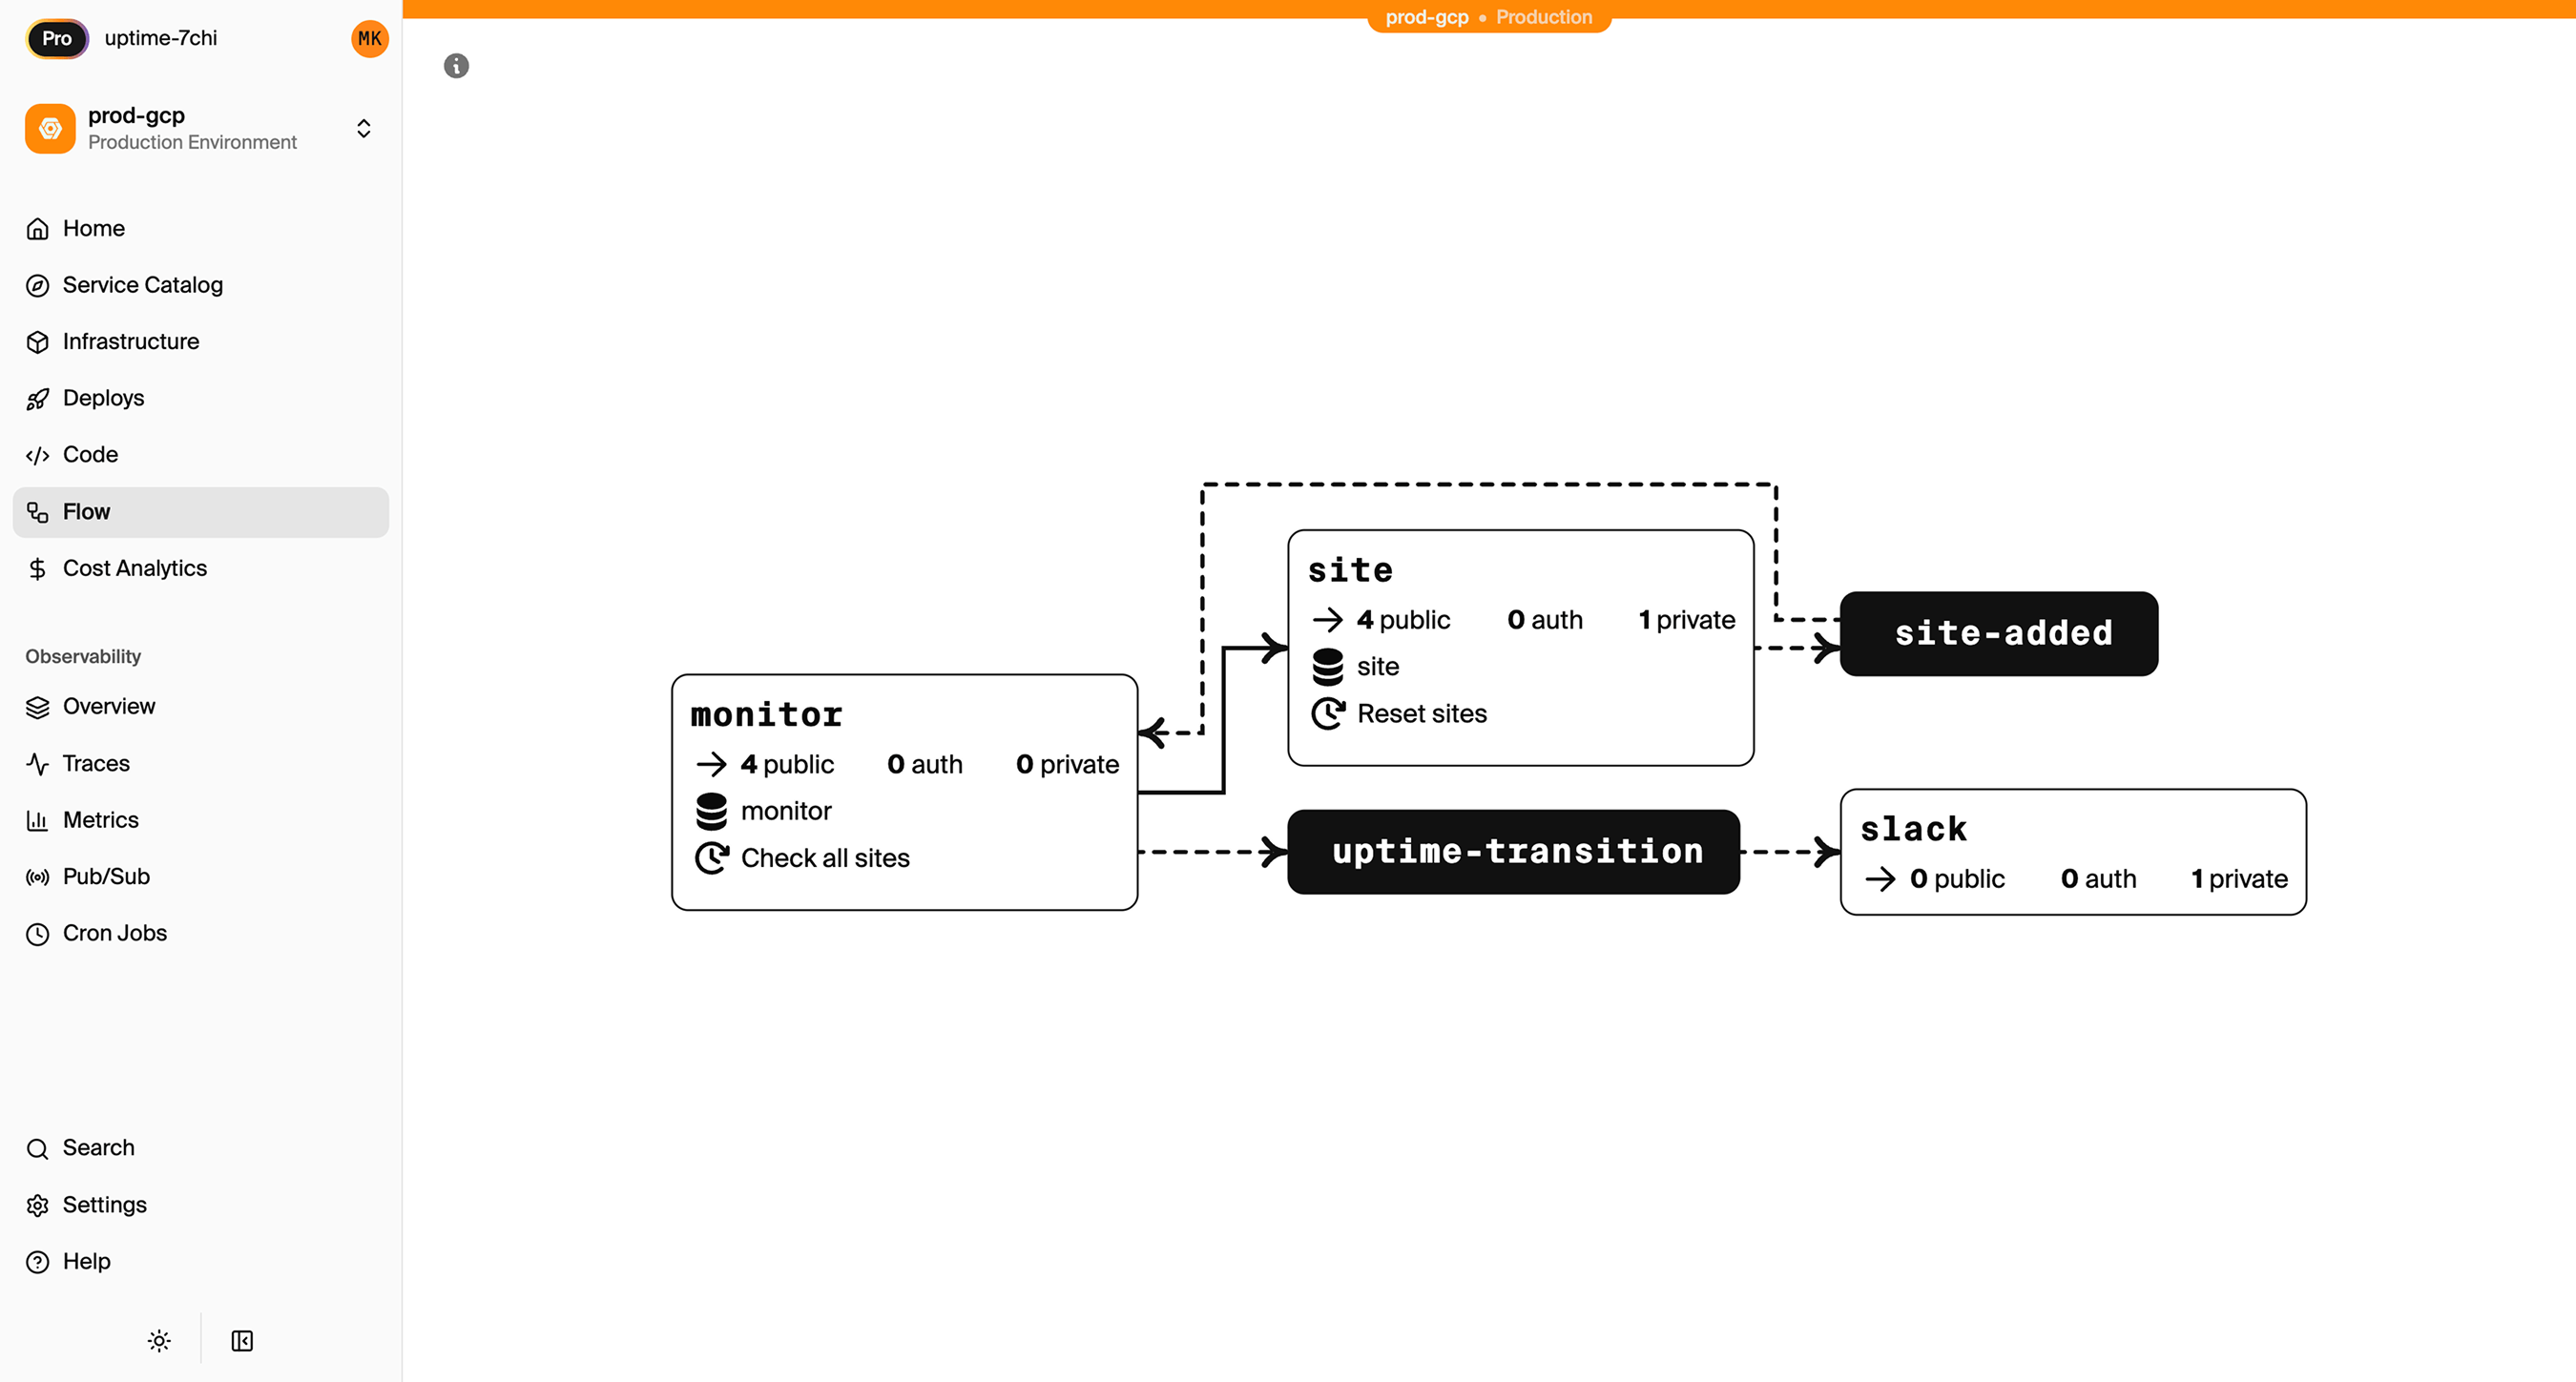
See the infrastructure primitives docs for the full list of supported resources.
Step 1: Migrate Your Web Dynos
Heroku uses a Procfile to define processes. With Encore, the infrastructure is defined by your code.
Heroku Procfile:
web: npm start
Encore equivalent:
import { api } from "encore.dev/api";

// Each endpoint gets built-in tracing, metrics, and API docs automatically.
export const hello = api(
  { method: "GET", path: "/hello/:name", expose: true },
  async ({ name }: { name: string }): Promise<{ message: string }> => {
    return { message: `Hello, ${name}!` };
  }
);

export const health = api(
  { method: "GET", path: "/health", expose: true },
  async () => ({ status: "ok", timestamp: new Date().toISOString() })
);
No Procfile, no Dockerfile, no configuration needed. Encore analyzes your code to understand what infrastructure it needs, and the encore.dev/api import tells it this is an HTTP endpoint. When deployed, it provisions a load balancer, Fargate tasks, and auto-scaling.
If you have multiple Heroku apps that communicate with each other, create separate Encore services:
// api/encore.service.ts
import { Service } from "encore.dev/service";
export default new Service("api");

// billing/encore.service.ts
import { Service } from "encore.dev/service";
export default new Service("billing");
Services can call each other with type-safe imports:
import { billing } from "~encore/clients";

// Call the billing service, fully type-safe
const invoice = await billing.getInvoice({ orderId: "123" });
This replaces any inter-service HTTP calls you had between Heroku apps, with compile-time type checking.
Step 2: Migrate Heroku Postgres to RDS
Both Heroku and AWS use PostgreSQL, so the migration is a data transfer rather than a schema conversion.
Export from Heroku
Get your connection string from the Heroku dashboard or CLI:
# Get the database URL
heroku config:get DATABASE_URL -a your-app

# Export with pg_dump
heroku pg:backups:capture -a your-app
heroku pg:backups:download -a your-app

# Or use pg_dump directly
pg_dump "your-heroku-database-url" > backup.sql
For large databases, use the --jobs flag for parallel export:
pg_dump --jobs=4 --format=directory --file=backup_dir "your-heroku-database-url"
Set Up the Encore Database
Define your database in code:
import { SQLDatabase } from "encore.dev/storage/sqldb";

const db = new SQLDatabase("main", {
  migrations: "./migrations",
});
That's the complete database definition, and Encore analyzes this at compile time to provision RDS PostgreSQL when you deploy.
Put your existing migration files in ./migrations. If you don't have migration files (common with Heroku), create them from your current schema:
# Generate schema-only dump
pg_dump --schema-only "your-heroku-database-url" > migrations/001_initial.up.sql
Import to RDS
After deploying with Encore, get the RDS connection string and import:
# Get the production connection string
encore db conn-uri main --env=production

# Import your data
psql "postgresql://user:pass@your-rds.amazonaws.com/main" < backup.sql
Update Your Queries
If you were using an ORM like Prisma or Drizzle, it should work with minimal changes since the underlying database is still PostgreSQL. For raw queries, Encore provides type-safe tagged template queries:
interface User {
  id: string;
  email: string;
  name: string;
  createdAt: Date;
}

export const getActiveUsers = api(
  { method: "GET", path: "/users/active", expose: true },
  async (): Promise<{ users: User[] }> => {
    const rows = await db.query<User>`
      SELECT id, email, name, created_at as "createdAt"
      FROM users
      WHERE active = true
      ORDER BY created_at DESC
    `;

    const users: User[] = [];
    for await (const user of rows) {
      users.push(user);
    }
    return { users };
  }
);
Step 3: Migrate Heroku Redis
If you're using Heroku Redis, the migration path depends on what you're using it for.
For Job Queues (Sidekiq, Bull, BullMQ): Use Pub/Sub
Redis-backed job queues are the most common use case. They map well to Pub/Sub. Encore's Pub/Sub provisions SNS/SQS on AWS, which handles queue semantics natively.
Before (Heroku with Bull):
import Queue from "bull";

const emailQueue = new Queue("email", process.env.REDIS_URL);

// Producer
await emailQueue.add({ to: "user@example.com", subject: "Welcome" });

// Consumer (worker dyno)
emailQueue.process(async (job) => {
  await sendEmail(job.data.to, job.data.subject);
});
After (Encore):
import { Topic, Subscription } from "encore.dev/pubsub";
import { api } from "encore.dev/api";

interface EmailJob {
  to: string;
  subject: string;
  body: string;
}

export const emailQueue = new Topic<EmailJob>("email-queue", {
  deliveryGuarantee: "at-least-once",
});

// Enqueue from API
export const requestPasswordReset = api(
  { method: "POST", path: "/auth/reset", expose: true },
  async (req: { email: string }): Promise<{ success: boolean }> => {
    await emailQueue.publish({
      to: req.email,
      subject: "Password Reset",
      body: "Click here to reset your password...",
    });
    return { success: true };
  }
);

// Process jobs (runs automatically when messages arrive)
const _ = new Subscription(emailQueue, "send-email", {
  handler: async (job) => {
    await sendEmail(job.to, job.subject, job.body);
  },
});
The subscription handler processes each message and failed messages retry automatically with exponential backoff.
For Caching: Consider Alternatives
If you're using Heroku Redis purely for caching:
-
ElastiCache: Provision separately via AWS Console or Terraform. Connect with the Redis client using a connection string from Encore secrets.
-
Database caching: For simple caching, a PostgreSQL table with TTL works fine. Add an index on the cache key and a cron job to clean expired entries.
-
In-memory caching: For request-scoped or short-lived data, in-process caching might be sufficient.
For Pub/Sub: Use Encore Pub/Sub
If you're using Redis pub/sub for real-time messaging, it maps directly to Encore's Topic and Subscription model. On AWS, this provisions SNS/SQS with proper dead-letter queues and retry policies.
Step 4: Migrate Worker Dynos
Heroku worker dynos are separate processes defined in your Procfile:
Heroku Procfile:
web: npm start
worker: node worker.js
With Encore, background workers become Pub/Sub subscribers. There's no separate process to manage. The subscriber runs in the same deployment but processes messages asynchronously.
import { Topic, Subscription } from "encore.dev/pubsub";

interface ProcessingJob {
  itemId: string;
  action: "resize" | "compress" | "analyze";
}

const processingQueue = new Topic<ProcessingJob>("processing", {
  deliveryGuarantee: "at-least-once",
});

// Enqueue work from your API
export const startProcessing = api(
  { method: "POST", path: "/items/:id/process", expose: true },
  async ({ id }: { id: string }): Promise<{ queued: boolean }> => {
    await processingQueue.publish({ itemId: id, action: "resize" });
    return { queued: true };
  }
);

// Process jobs automatically
const _ = new Subscription(processingQueue, "process-items", {
  handler: async (job) => {
    await processItem(job.itemId, job.action);
  },
});
Step 5: Migrate Heroku Scheduler
Heroku Scheduler runs tasks at set intervals. These become Encore CronJobs:
Heroku Scheduler:
rake cleanup:expired_sessions Every day at 2:00 AM UTC
Encore:
import { CronJob } from "encore.dev/cron";
import { api } from "encore.dev/api";

export const cleanup = api(
  { method: "POST", path: "/internal/cleanup" },
  async (): Promise<{ deleted: number }> => {
    const result = await db.exec`
      DELETE FROM sessions WHERE expires_at < NOW()
    `;
    console.log(`Deleted ${result.rowsAffected} expired sessions`);
    return { deleted: result.rowsAffected };
  }
);

const _ = new CronJob("daily-cleanup", {
  title: "Clean up expired sessions",
  schedule: "0 2 * * *",
  endpoint: cleanup,
});
The cron declaration lives next to the code it runs, and on AWS this provisions CloudWatch Events to trigger the endpoint on schedule.
Step 6: Migrate Config Vars
Heroku config vars become Encore secrets for sensitive values:
Heroku:
heroku config:set STRIPE_SECRET_KEY=sk_live_...
heroku config:set SENDGRID_API_KEY=SG...
heroku config:set JWT_SECRET=your-secret
Encore:
# Set secrets for production
encore secret set --type=production StripeSecretKey
encore secret set --type=production SendgridApiKey
encore secret set --type=production JWTSecret
Access them in code:
import { secret } from "encore.dev/config";

const stripeKey = secret("StripeSecretKey");
const sendgridKey = secret("SendgridApiKey");

// Use in your code
const stripe = new Stripe(stripeKey());
Secrets are environment-specific (development, staging, production) and encrypted at rest.
Step 7: Migrate Heroku Pipelines
Heroku Pipelines give you staging and production environments. Encore has a similar concept with environments.
Heroku pipeline:
Development → Staging → Production
Encore environments:
- Preview environments: Automatically created for each pull request (replaces Heroku Review Apps)
- Staging: A persistent environment for pre-production testing
- Production: Your live environment connected to your AWS account
Each environment gets its own set of infrastructure resources. Preview environments spin up and down automatically with your PRs.
Step 8: Deploy to AWS
-
Connect your AWS account in the Encore Cloud dashboard. You'll set up an IAM role that gives Encore permission to provision resources. See the AWS setup guide for details.
-
Push your code:
git push encore main -
Run data migrations (database import, file sync if applicable)
-
Test in preview environment. Each pull request gets its own environment.
-
Update DNS to point to your new endpoints
-
Remove Heroku apps after verification
What Gets Provisioned
Encore creates in your AWS account:
- Fargate for running your application
- RDS PostgreSQL for your database
- S3 for any object storage (if you define buckets)
- SNS/SQS for Pub/Sub messaging
- CloudWatch Events for cron scheduling
- Application Load Balancer for HTTP routing
- CloudWatch Logs for application logs
- IAM roles with least-privilege access
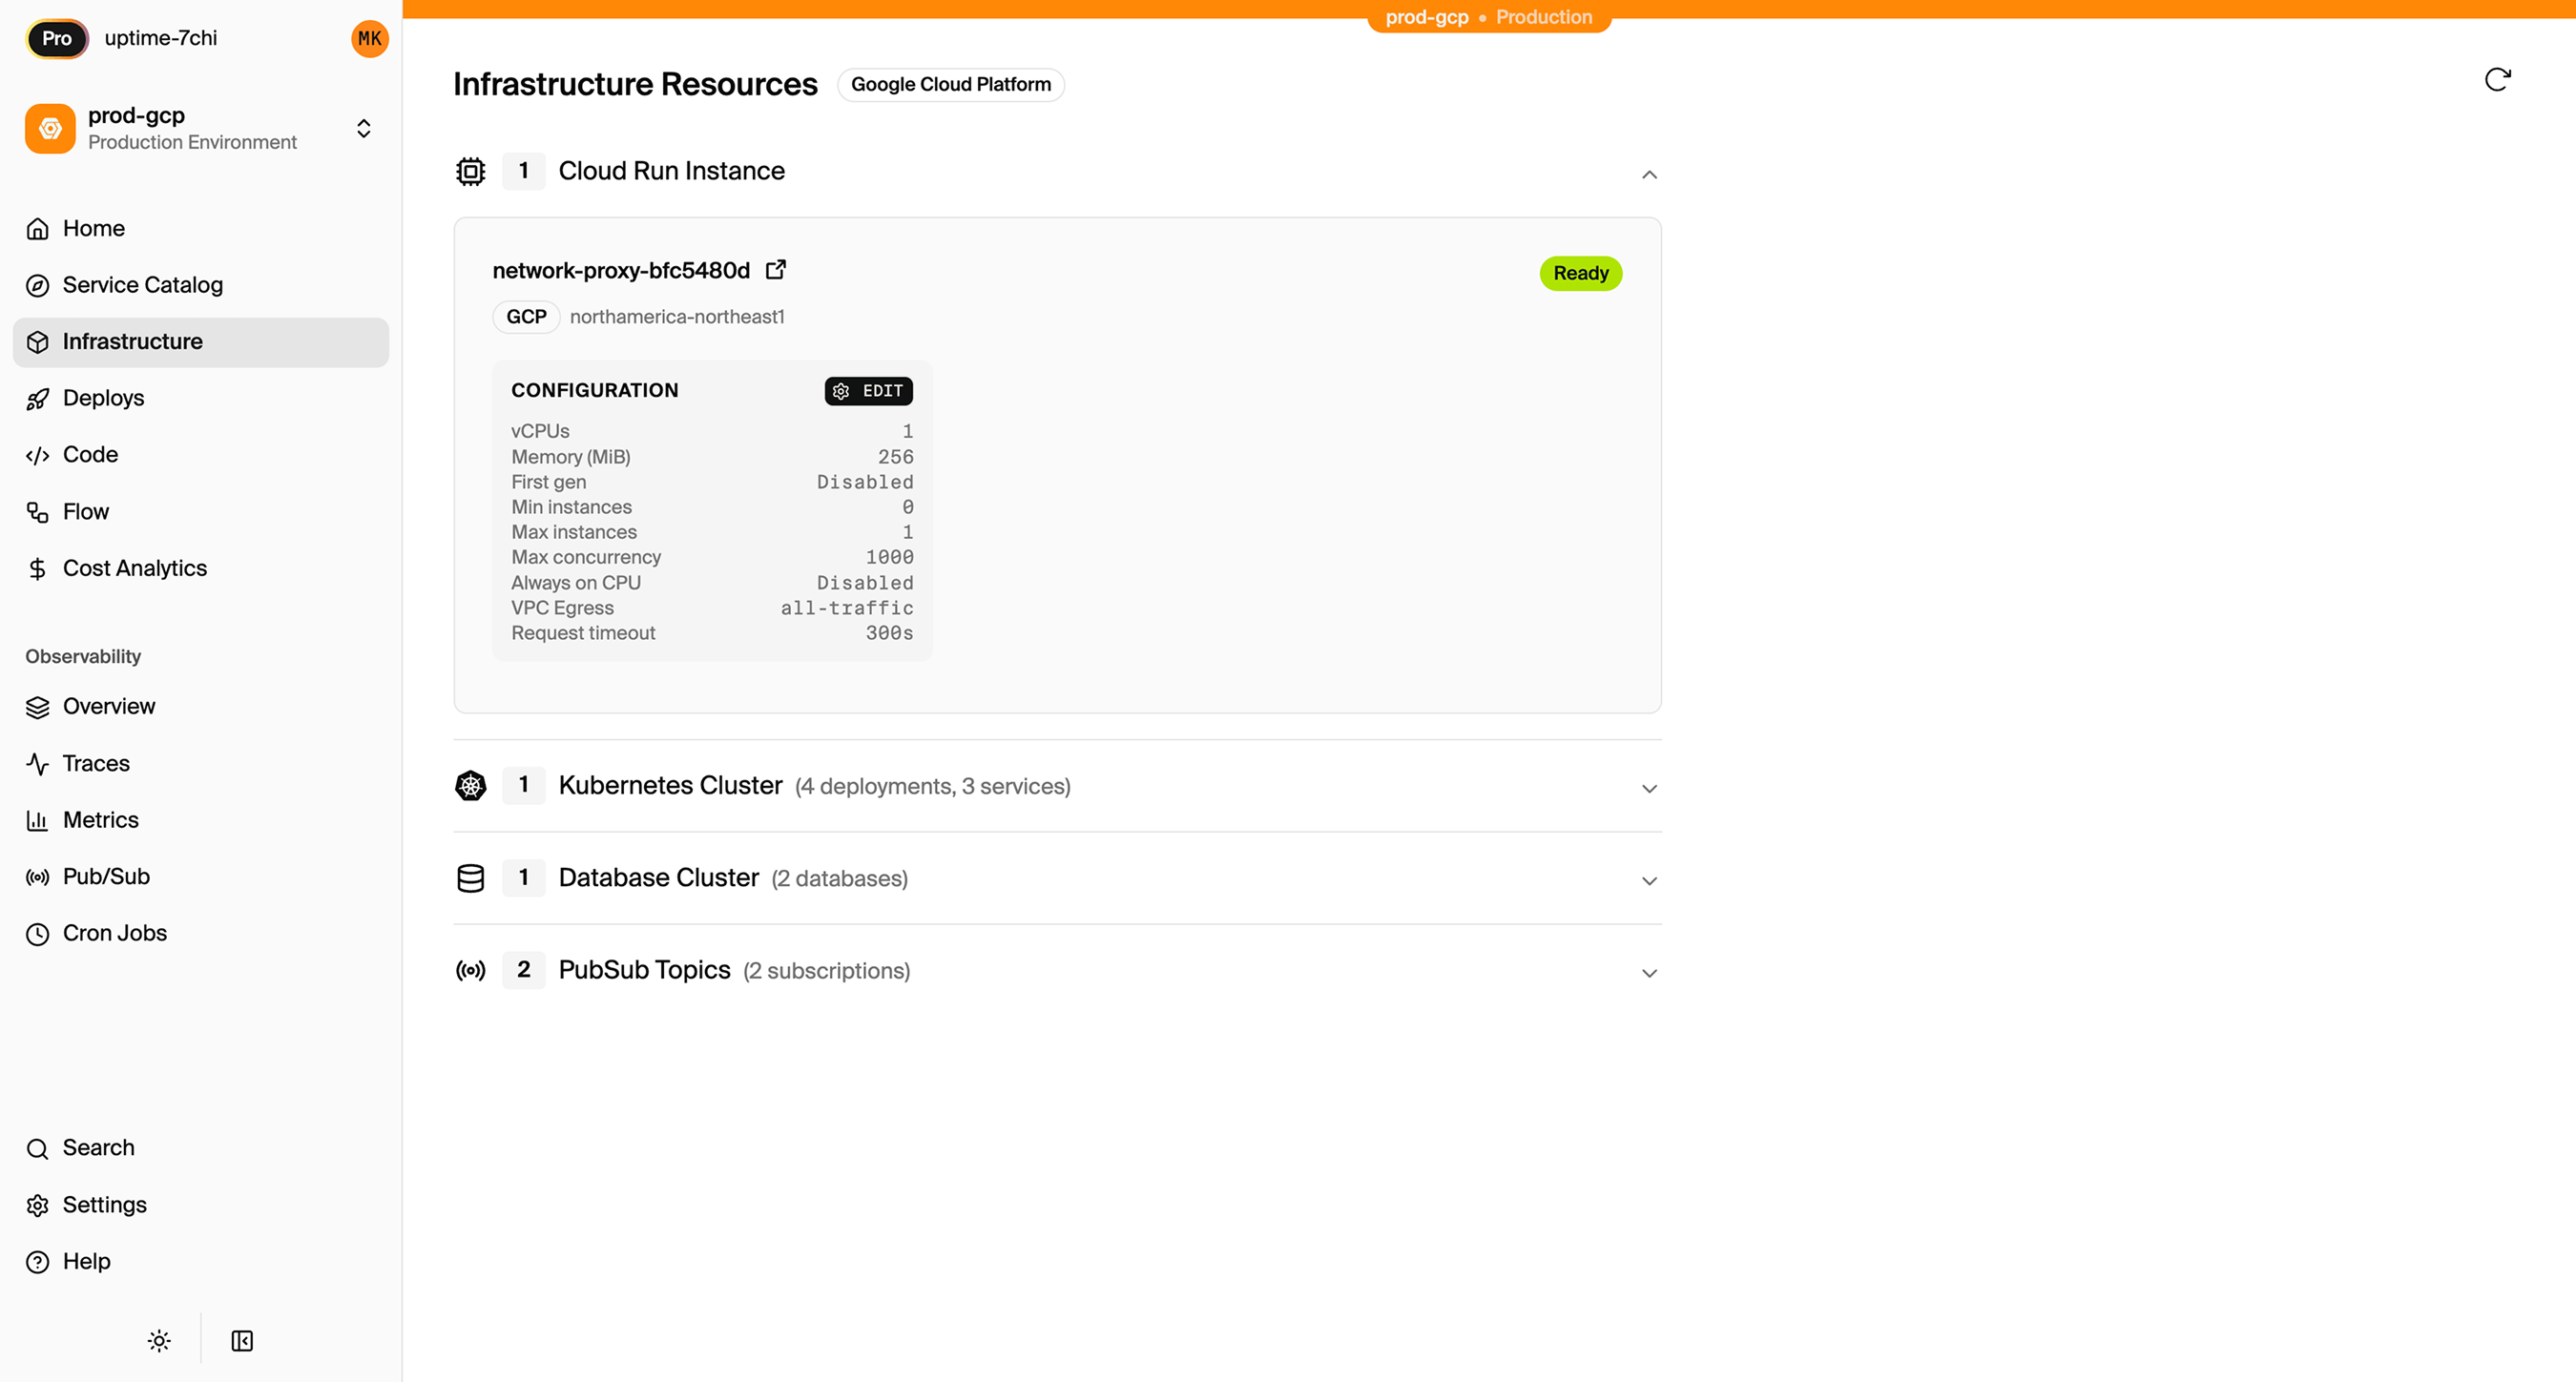
You can view and manage these resources directly in the AWS console.
Encore Cloud also gives you a dashboard showing all provisioned infrastructure across environments:
Migration Checklist
- Inventory all Heroku apps and their dependencies
- Export Heroku Postgres database
- Create Encore app with service structure matching your Heroku apps
- Set up database schema and migrations
- Import data to RDS after first deploy
- Convert worker dynos to Pub/Sub subscribers
- Convert Heroku Scheduler jobs to CronJobs
- Migrate Redis usage (queue → Pub/Sub, cache → alternatives)
- Move config vars to Encore secrets
- Set up environments (staging, production)
- Test in preview environment
- Update DNS
- Monitor for issues
- Delete Heroku apps
Wrapping Up
Migrating from Heroku to AWS gives you infrastructure ownership and AWS ecosystem access. The code changes are minimal since the core concepts (services, databases, background jobs, cron) are the same, just expressed differently.
The biggest shift is replacing Redis-backed job queues with Pub/Sub. For most applications, this is a better fit anyway: managed message queues with automatic retries, dead-letter queues, and no Redis instance to manage.
Try deploying a TypeScript backend to your own AWS account:
Want to jump straight to a running app? Clone this starter and deploy it to your own cloud.