 Ivan Cernja
How to Migrate from Railway to AWS
Move from Railway to your own AWS account for infrastructure ownership

Railway gives you a clean deployment experience where you push code and get a URL. For straightforward apps, that's often enough, but it gets harder when your backend needs to talk to other infrastructure. Railway doesn't support VPC peering, so there's no way to privately connect to existing cloud services, and Railway's Postgres doesn't have read replicas or point-in-time recovery. RDS on AWS has both out of the box, and running in your own AWS account means your backend can sit in the same private network as your other services.
The traditional path to AWS means learning Terraform or CloudFormation, writing hundreds of lines of infrastructure config, and becoming your own DevOps team. That's a big jump from Railway's simplicity.
This guide takes a different approach: migrating to your own AWS account using Encore and Encore Cloud. Encore is an open-source TypeScript backend framework (11k+ GitHub stars) where you define infrastructure as type-safe objects in your code: databases, Pub/Sub, cron jobs, object storage. Encore Cloud then provisions these resources in your AWS account using managed services like RDS, SQS, and S3.
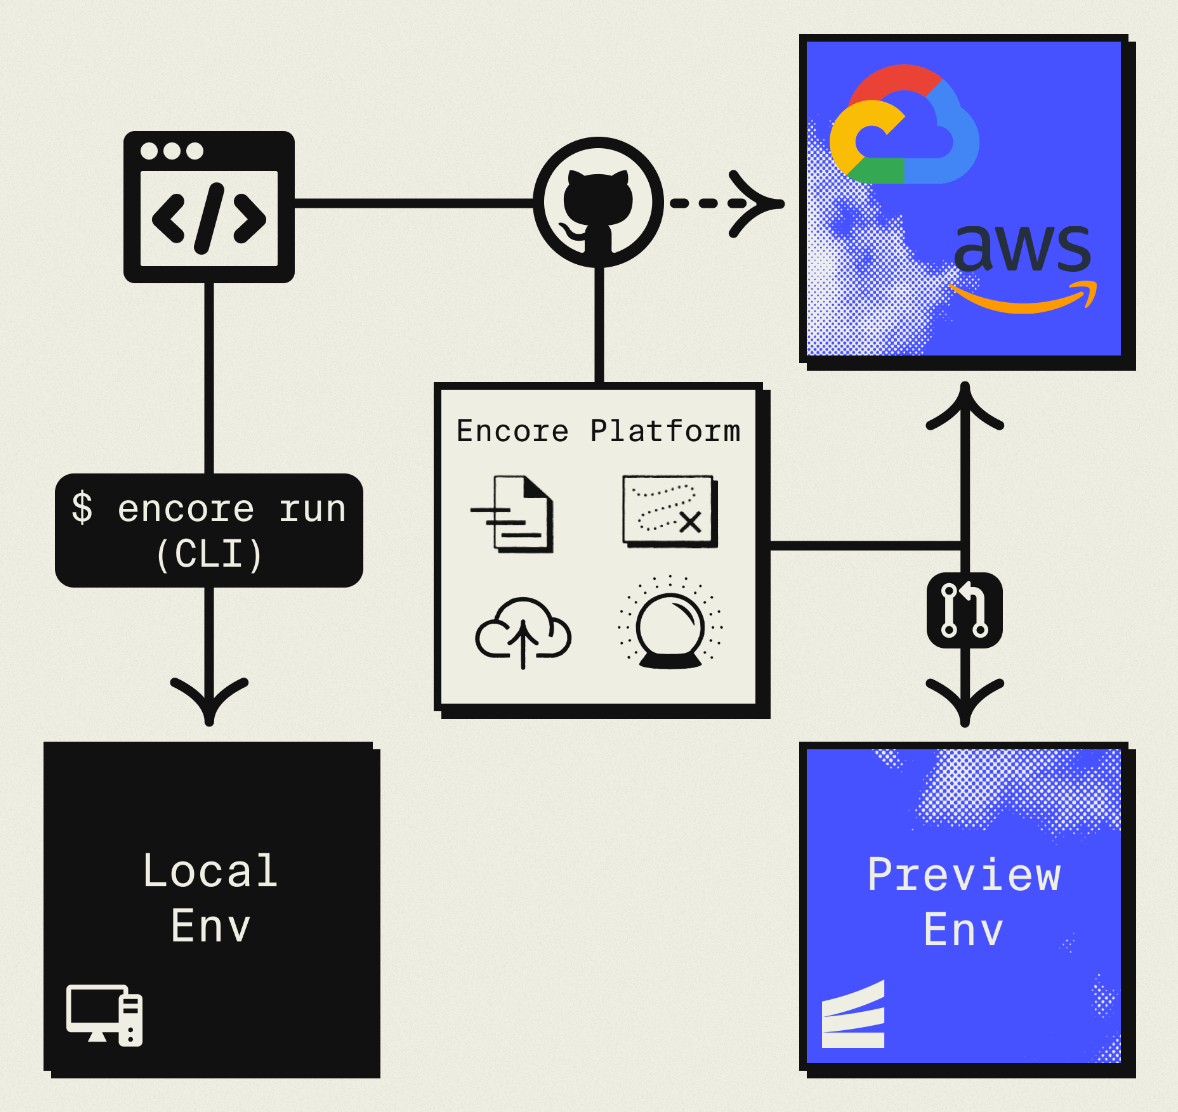
The result is AWS infrastructure you own and control, but with a developer experience similar to Railway: push code, get a deployment. No Terraform to learn, no YAML to maintain. Companies like Groupon already use this approach to power their backends at scale.
Understanding What Gets Migrated
Before diving in, let's map Railway concepts to their AWS equivalents:
| Railway Component | AWS Equivalent (via Encore) |
|---|---|
| Railway Services | Fargate |
| Railway Postgres | Amazon RDS |
| Railway Redis | ElastiCache or Pub/Sub |
| Railway Cron | CloudWatch Events |
| Railway Variables | Secrets Manager |
The mapping is fairly direct. Railway services become Encore APIs running on Fargate. Your Postgres database moves to RDS. Environment variables become secrets. The main difference is that these resources now live in an AWS account you control.
Why Teams Migrate from Railway
Most teams migrate for one of these reasons:
Infrastructure ownership: Railway doesn't give you access to the underlying infrastructure. You can't configure VPCs, set up peering connections, or access AWS-specific features. With AWS, you get full control over networking, security groups, and IAM.
Cost at scale: Railway's usage-based pricing works well for small apps but can get expensive as you grow. AWS offers reserved instances and savings plans that significantly reduce costs at scale. A database that costs $200/month on Railway might cost $80/month on RDS with reserved pricing.
Compliance requirements: Some industries require infrastructure in accounts you control. Healthcare, finance, and government contracts often mandate specific compliance controls that managed platforms can't provide.
AWS ecosystem access: Direct access to services like SQS, DynamoDB, Lambda@Edge, and other AWS-native tools without networking workarounds.
What Encore Handles For You
When you deploy to AWS through Encore Cloud, every resource gets production defaults: private VPC placement, least-privilege IAM roles, encryption at rest, automated backups where applicable, and CloudWatch logging. You don't configure this per resource. It's automatic.
Encore follows AWS best practices and gives you guardrails. You can review infrastructure changes before they're applied, and everything runs in your own AWS account so you maintain full control.
Here's what that looks like in practice:
import { SQLDatabase } from "encore.dev/storage/sqldb";
import { Bucket } from "encore.dev/storage/objects";
import { Topic } from "encore.dev/pubsub";
import { CronJob } from "encore.dev/cron";

const db = new SQLDatabase("main", { migrations: "./migrations" });
const uploads = new Bucket("uploads", { versioned: false });
const events = new Topic<OrderEvent>("events", { deliveryGuarantee: "at-least-once" });
const _ = new CronJob("daily-cleanup", { schedule: "0 0 * * *", endpoint: cleanup });
This provisions RDS, S3, SNS/SQS, and CloudWatch Events with proper networking, IAM, and monitoring. You write TypeScript or Go, Encore handles the Terraform. The only Encore-specific parts are the import statements. Your business logic is standard TypeScript, so you're not locked in.
Encore Cloud visualizes how your services connect, including Pub/Sub topics, cron jobs, and database dependencies:
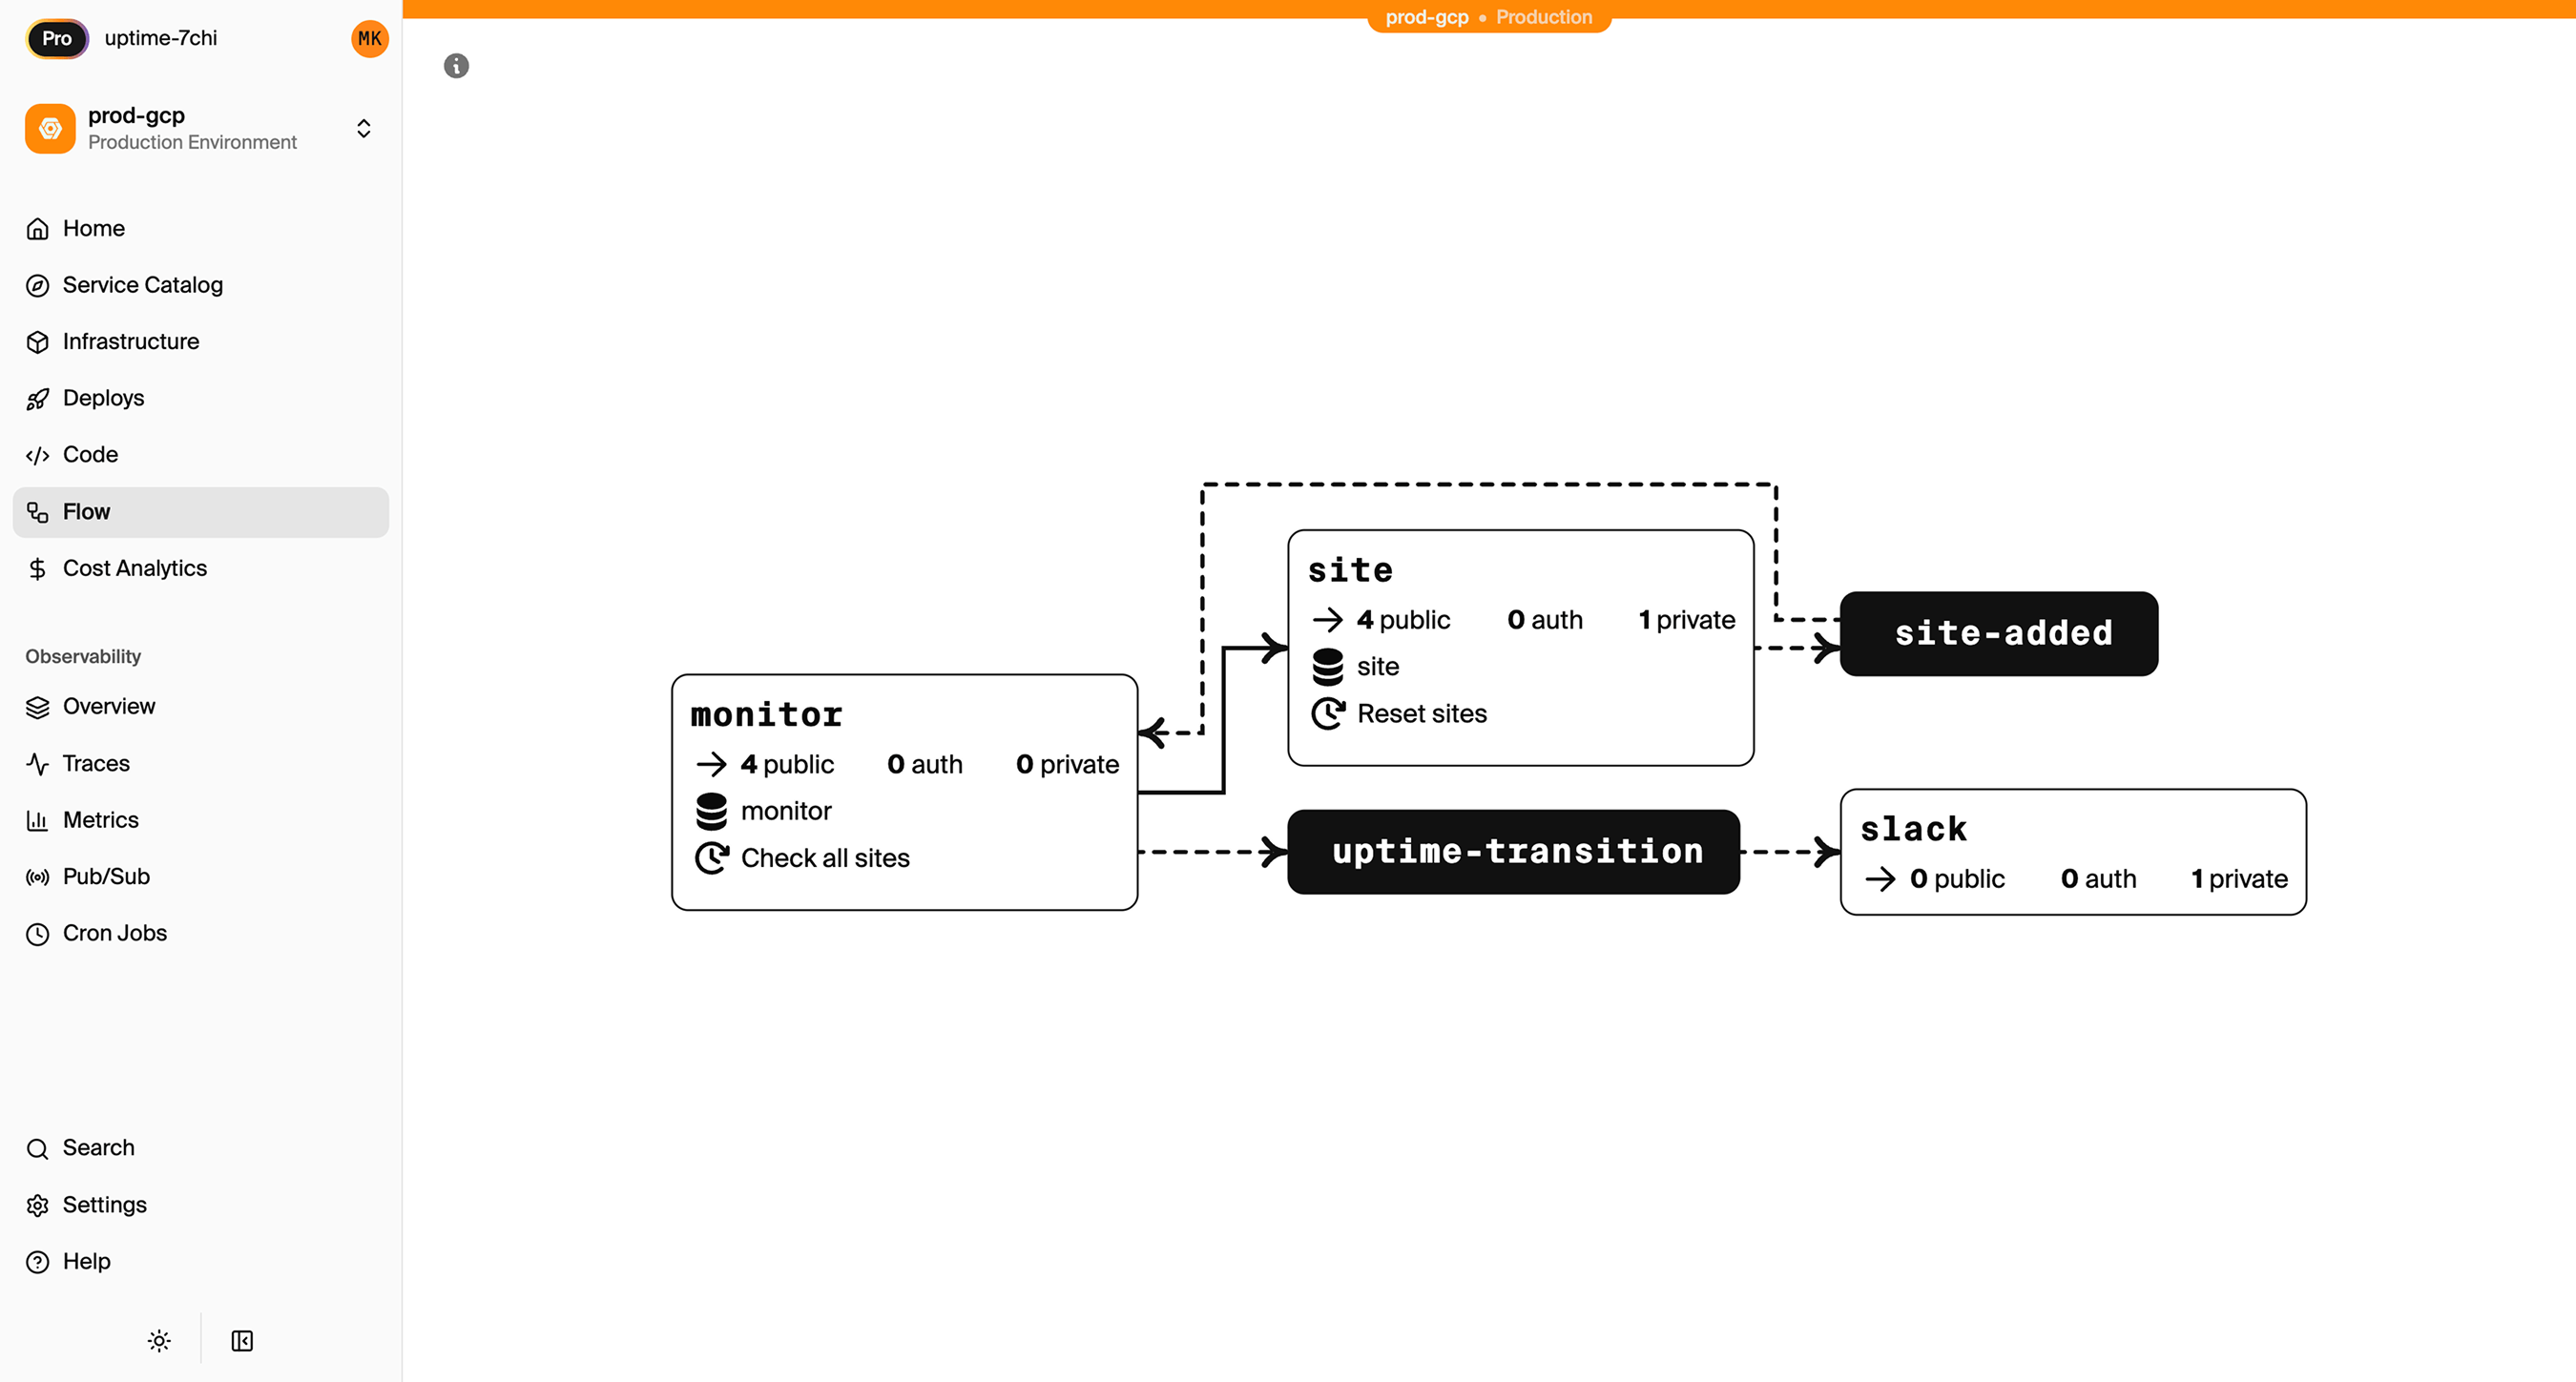
See the infrastructure primitives docs for the full list of supported resources.
Step 1: Migrate Your Application Code
Railway applications typically have a Dockerfile or use Nixpacks to build containers. Encore takes a different approach: you write your application code, and Encore handles containerization.
Here's what a typical Railway service looks like as an Encore API:
import { api } from "encore.dev/api";

interface HelloRequest {
  name: string;
}

interface HelloResponse {
  message: string;
}

export const hello = api(
  { method: "POST", path: "/hello", expose: true },
  async (req: HelloRequest): Promise<HelloResponse> => {
    return { message: `Hello, ${req.name}!` };
  }
);
There's no Dockerfile to maintain. Encore analyzes your code, understands what infrastructure it needs, and generates the appropriate container configuration. When you deploy to AWS, it creates Fargate tasks.
If you have multiple Railway services, each becomes an Encore service. Create an encore.service.ts file in each service directory:
// users/encore.service.ts
import { Service } from "encore.dev/service";
export default new Service("users");

// orders/encore.service.ts
import { Service } from "encore.dev/service";
export default new Service("orders");
Services can call each other using type-safe imports:
import { users } from "~encore/clients";

export const getOrderWithUser = api(
  { method: "GET", path: "/orders/:id", expose: true },
  async ({ id }: { id: string }) => {
    const order = await getOrder(id);
    const user = await users.getUser({ id: order.userId });
    return { order, user };
  }
);
Step 2: Migrate Your Postgres Database
Railway provides managed Postgres with connection strings in the dashboard. Migrating to RDS involves three steps: export your data, set up the Encore database, and import.
Export from Railway
Find your connection string in the Railway dashboard under your Postgres service. Then use pg_dump:
pg_dump "postgresql://postgres:password@containers-us-west-123.railway.app:5432/railway" > backup.sql
If your database is large, consider using pg_dump with the --jobs flag for parallel export, or export specific tables incrementally.
Set Up the Encore Database
Define your database in code. Encore uses migration files to manage schema:
import { SQLDatabase } from "encore.dev/storage/sqldb";

const db = new SQLDatabase("main", {
  migrations: "./migrations",
});
That's the complete database definition. Encore analyzes this at compile time and provisions RDS PostgreSQL when you deploy. No Terraform, no CloudFormation, no YAML config.
Your existing migration files should work as-is. If you were using a migration tool like Prisma or Drizzle, Encore supports those too. The key requirement is that migrations produce standard SQL files.
Import to RDS
After deploying to Encore (we'll cover this in the final step), your RDS instance will be ready. Get the connection string and import:
# Get the production RDS connection
encore db conn-uri main --env=production

# Import your data
psql "postgresql://user:pass@your-rds-instance.amazonaws.com:5432/main" < backup.sql
For large databases, consider using AWS Database Migration Service (DMS) for a live migration with minimal downtime.
Step 3: Migrate Cron Jobs
Railway supports cron through separate services with a schedule configuration. Encore has built-in cron support that's simpler to configure.
A Railway cron service might look like this in railway.json:
{
  "$schema": "https://railway.app/railway.schema.json",
  "build": {},
  "deploy": {
    "cronSchedule": "0 * * * *"
  }
}
With Encore, cron is declared in code alongside the endpoint it triggers:
import { CronJob } from "encore.dev/cron";
import { api } from "encore.dev/api";

// The endpoint that runs on schedule
export const processHourlyTasks = api(
  { method: "POST", path: "/internal/hourly-tasks" },
  async (): Promise<{ processed: number }> => {
    const count = await runHourlyProcessing();
    return { processed: count };
  }
);

// The cron job definition
const _ = new CronJob("hourly-processing", {
  title: "Process hourly tasks",
  schedule: "0 * * * *",
  endpoint: processHourlyTasks,
});
That's the complete cron definition. Encore sees this at compile time and creates CloudWatch Events rules when you deploy.
This approach has a few advantages. The cron configuration lives with the code it runs, making it easier to understand what happens when. You can also test the endpoint directly without waiting for the schedule. On AWS, Encore uses CloudWatch Events to trigger the cron.
Step 4: Replace Redis
Many Railway apps use Redis for caching, job queues, or pub/sub. The migration path depends on what you're using Redis for.
For Job Queues: Use Pub/Sub
If you're using Redis with BullMQ or similar for job queues, Encore's Pub/Sub is a better fit on AWS. It provisions SNS/SQS, which handles queue semantics natively.
import { Topic, Subscription } from "encore.dev/pubsub";

// Define the job structure
interface ProcessingJob {
  type: string;
  payload: Record<string, unknown>;
}

// Create a topic for jobs
const jobQueue = new Topic<ProcessingJob>("jobs", {
  deliveryGuarantee: "at-least-once",
});
This Topic declaration is all Encore needs. At compile time, it understands you need a message queue. On AWS, it provisions SNS + SQS with proper IAM policies.
// Publish jobs from your API
export const enqueueJob = api(
  { method: "POST", path: "/jobs", expose: true },
  async (req: ProcessingJob): Promise<{ queued: boolean }> => {
    await jobQueue.publish(req);
    return { queued: true };
  }
);

// Process jobs with a subscription
const _ = new Subscription(jobQueue, "worker", {
  handler: async (job) => {
    switch (job.type) {
      case "send-email":
        await sendEmail(job.payload);
        break;
      case "process-image":
        await processImage(job.payload);
        break;
    }
  },
});
The subscription handler runs for each message. If it throws an error, the message is retried automatically with exponential backoff.
For Caching: Consider Alternatives
If you're using Redis purely for caching, you have a few options:
-
ElastiCache: Provision a Redis cluster separately through AWS Console or Terraform. Connect to it from your Encore app using the connection string as a secret.
-
Database caching: For simple caching needs, a PostgreSQL table with TTL-based cleanup often works fine. Add an index on the lookup key and a background job to clean expired entries.
-
Application-level caching: For request-scoped or short-lived caches, in-memory caching within your application might be sufficient.
For Pub/Sub: Use Encore Pub/Sub
If you're using Redis pub/sub for real-time messaging between services, Encore's Pub/Sub maps directly:
import { Topic, Subscription } from "encore.dev/pubsub";

interface NotificationEvent {
  userId: string;
  message: string;
}

export const notifications = new Topic<NotificationEvent>("notifications", {
  deliveryGuarantee: "at-least-once",
});

// Publish from anywhere
await notifications.publish({ userId: "123", message: "New comment on your post" });

// Subscribe to handle
const _ = new Subscription(notifications, "push-notifier", {
  handler: async (event) => {
    await sendPushNotification(event.userId, event.message);
  },
});
Step 5: Migrate Environment Variables
Railway stores environment variables in the dashboard or railway.json. Encore uses secrets for sensitive values:
# Set secrets for production
encore secret set --type=production StripeKey
encore secret set --type=production SendgridApiKey
encore secret set --type=production DatabaseEncryptionKey
Access them in code:
import { secret } from "encore.dev/config";

const stripeKey = secret("StripeKey");
const sendgridKey = secret("SendgridApiKey");

// Use in your code
const stripe = new Stripe(stripeKey());
Secrets are encrypted at rest and injected at runtime. Different environments (development, staging, production) can have different values.
For non-sensitive configuration, you can use environment-specific config files or Encore's config system.
Step 6: Deploy to AWS
With your code migrated, connecting to AWS and deploying takes a few steps:
-
Connect your AWS account in the Encore Cloud dashboard. You'll grant Encore permissions to provision resources in your account. See the AWS setup guide for detailed instructions.
-
Push your code:
git push encore main -
Watch the deployment. Encore provisions all the infrastructure: Fargate for compute, RDS for databases, S3 for any object storage, SNS/SQS for Pub/Sub, and CloudWatch for logs.
-
Test in preview environment. Each pull request gets a preview environment with its own database, so you can verify the migration works before touching production.
-
Update DNS to point to your new endpoints.
-
Deprecate Railway services once you've verified everything works.
What Encore Provisions in Your AWS Account
After deployment, you'll see these resources in your AWS console:
- ECS Fargate for running your application code
- RDS PostgreSQL for your databases
- SNS/SQS for Pub/Sub messaging
- CloudWatch Events for cron scheduling
- Application Load Balancer for HTTP routing
- CloudWatch Logs for application logs
- Secrets Manager for your secrets
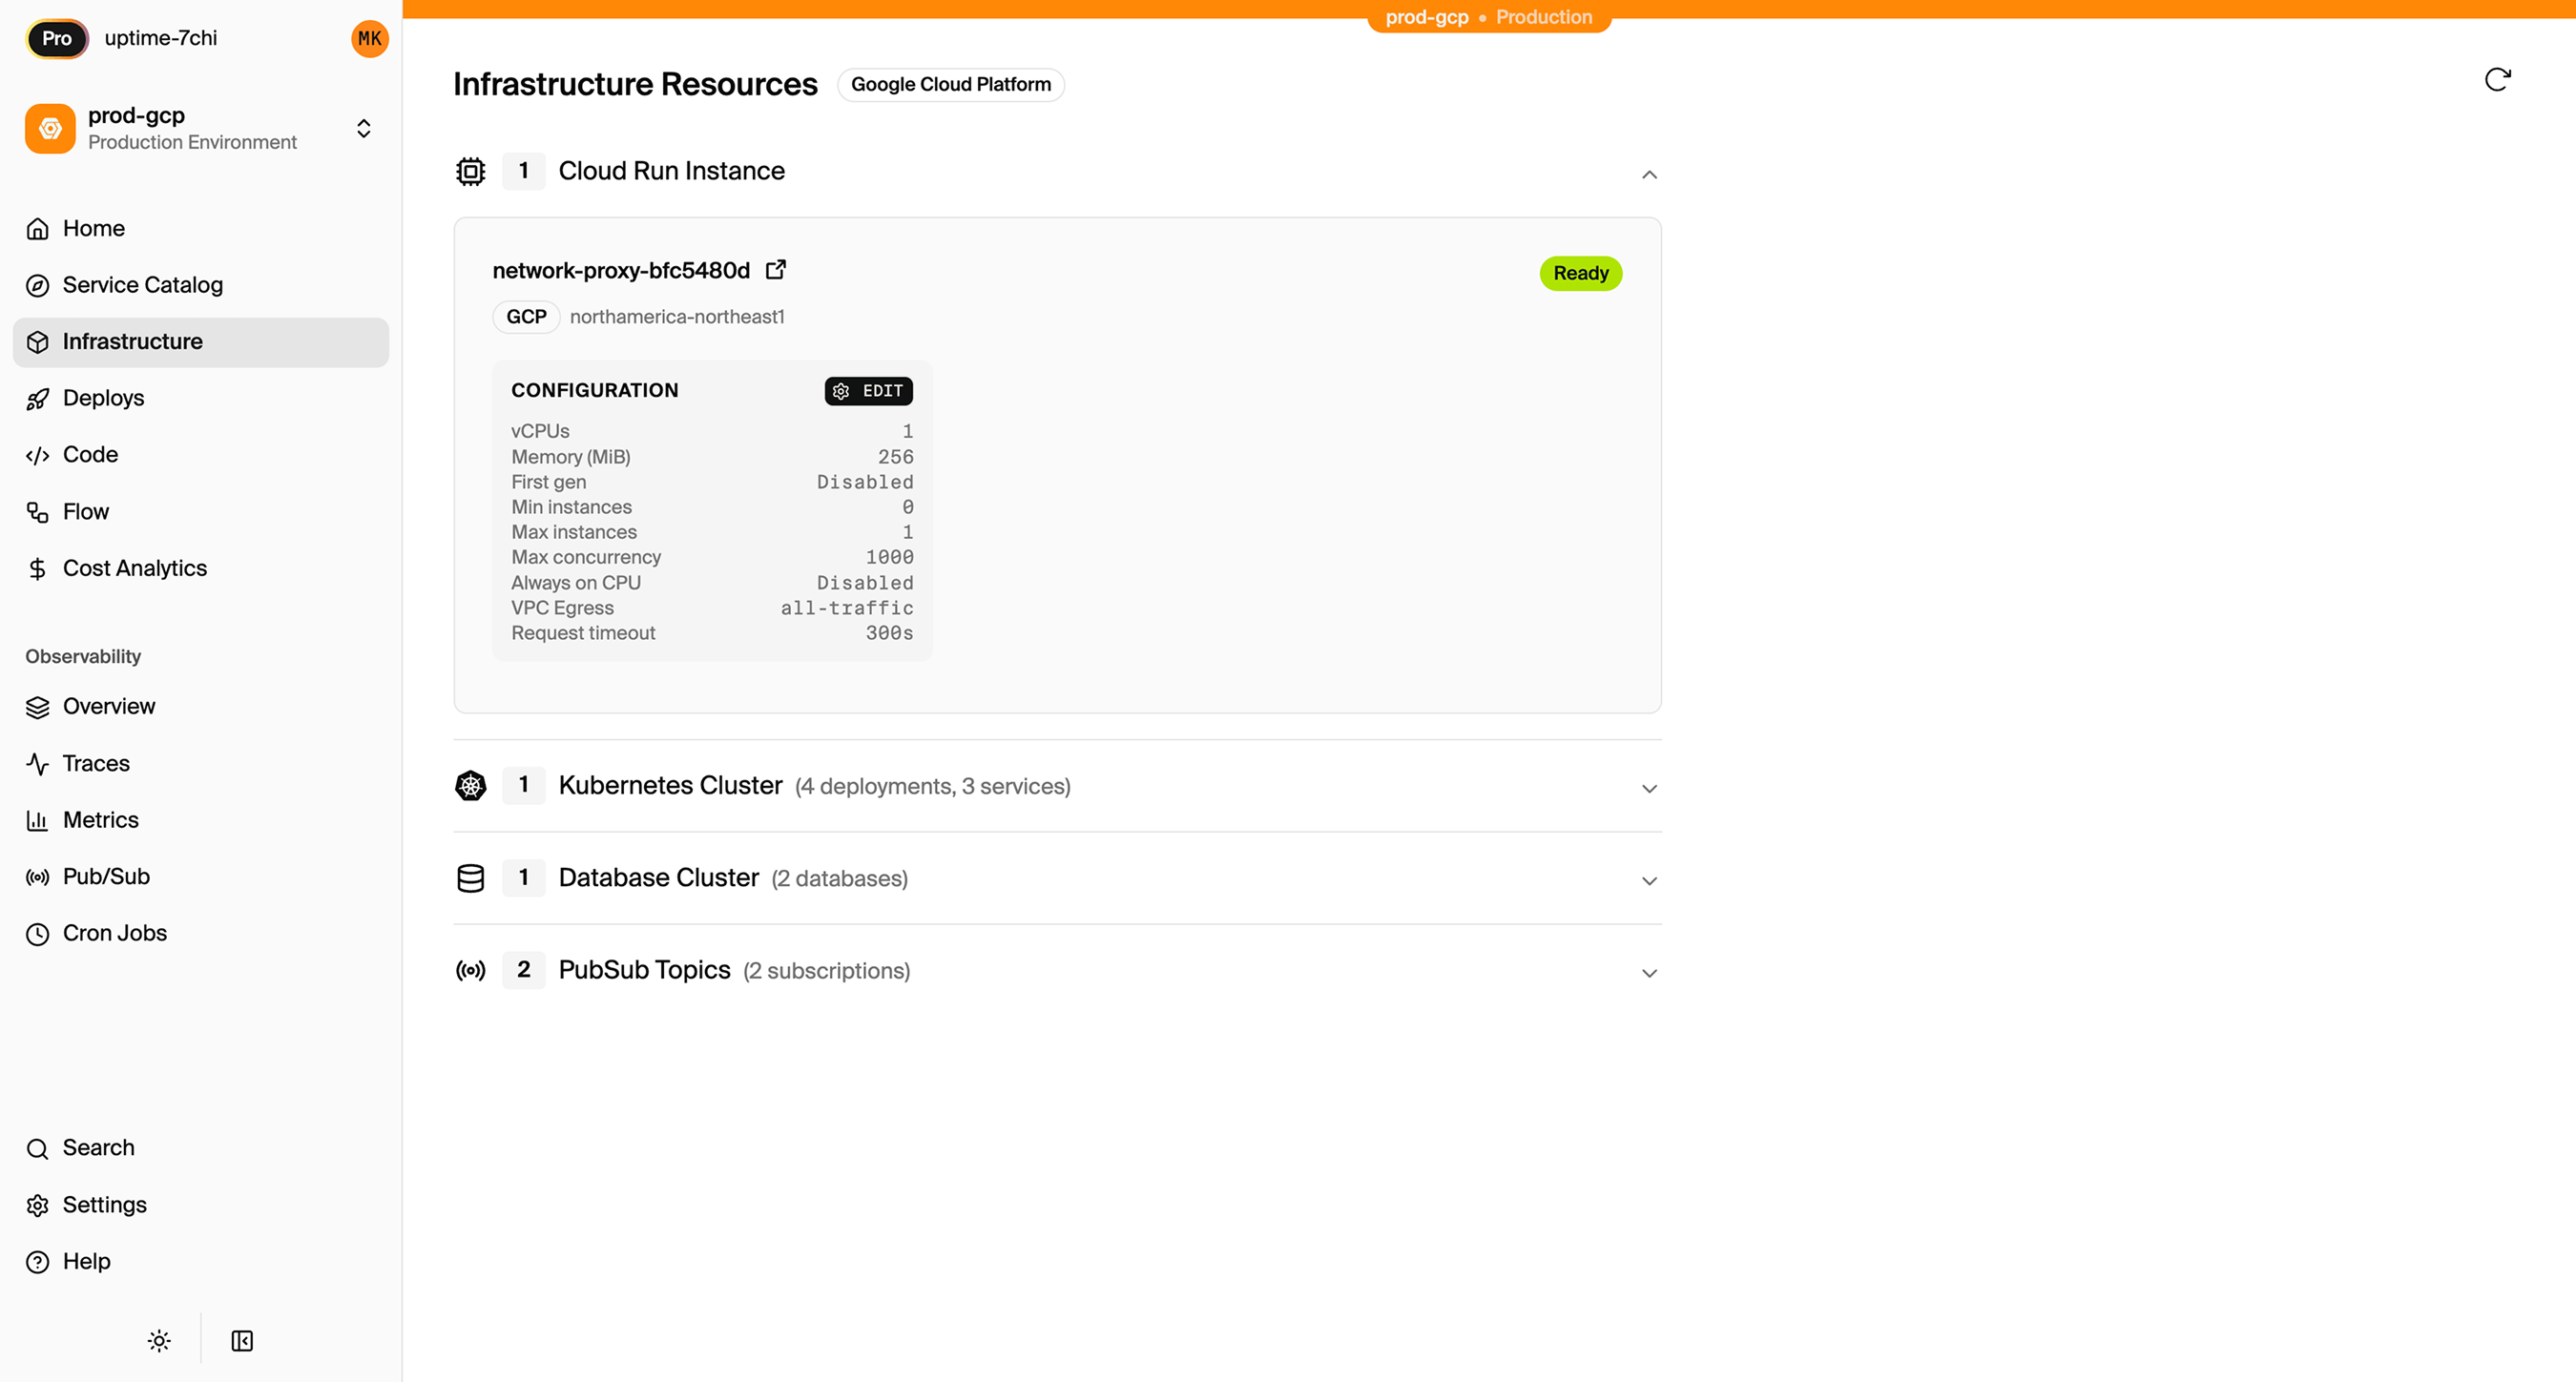
You have full access to these resources. You can view logs in CloudWatch, connect to RDS directly, and configure additional AWS services as needed.
Encore Cloud also gives you a dashboard showing all provisioned infrastructure across environments:
Comparing Railway and AWS via Encore
| Aspect | Railway | AWS via Encore |
|---|---|---|
| Developer experience | Push to deploy | Push to deploy |
| Infrastructure access | None | Full AWS console |
| Pricing model | Usage-based | Reserved capacity available |
| Compliance controls | Limited | Full AWS compliance |
| Vendor lock-in | Moderate | Low (standard AWS) |
| Database management | Managed | Managed (RDS) |
| Multi-region | Automatic | Manual setup |
Migration Checklist
- Inventory all Railway services
- Export Postgres database with pg_dump
- Create Encore app with equivalent APIs
- Set up database schema and migrations
- Import data to RDS after first deploy
- Convert cron jobs to Encore CronJob
- Migrate Redis usage to Pub/Sub or alternatives
- Move environment variables to Encore secrets
- Test in Encore preview environment
- Update DNS records
- Monitor for issues
- Deprecate Railway services
Wrapping Up
Migrating from Railway to AWS lets you keep a streamlined developer experience while gaining control over your infrastructure. The actual migration effort depends on your app's complexity, but the component mapping is direct: services become APIs, Postgres becomes RDS, and cron becomes CloudWatch Events.
The main adjustment is thinking about Redis alternatives. If you're using it for queues, Pub/Sub is a better fit on AWS. For caching, evaluate whether you actually need Redis or if simpler alternatives work.
Try deploying a TypeScript backend to your own AWS account:
Want to jump straight to a running app? Clone this starter and deploy it to your own cloud.