
 Ivan Cernja
Vercel has grown into a full backend platform, but the infrastructure underneath is still managed in their cloud account. With AI agents compressing the barrier to getting code running, the value of a deployment platform shifts. What matters more now is what comes after: infrastructure you control, costs you can predict, guardrails that hold up as the codebase grows.
As your backend grows on Vercel, more of your infrastructure sits in someone else's AWS account. You get their dashboard, their pricing, and their limits on what you can configure. Your compliance scope includes a third party managing infrastructure on your behalf.
This guide walks through migrating your Vercel backend to your own AWS account using Encore and Encore Cloud. Encore is an open-source TypeScript backend framework (11k+ GitHub stars) where you define infrastructure as type-safe objects in your code: databases, Pub/Sub, cron jobs, object storage. Encore Cloud provisions these resources in your AWS account using managed services like RDS, SQS, and S3.
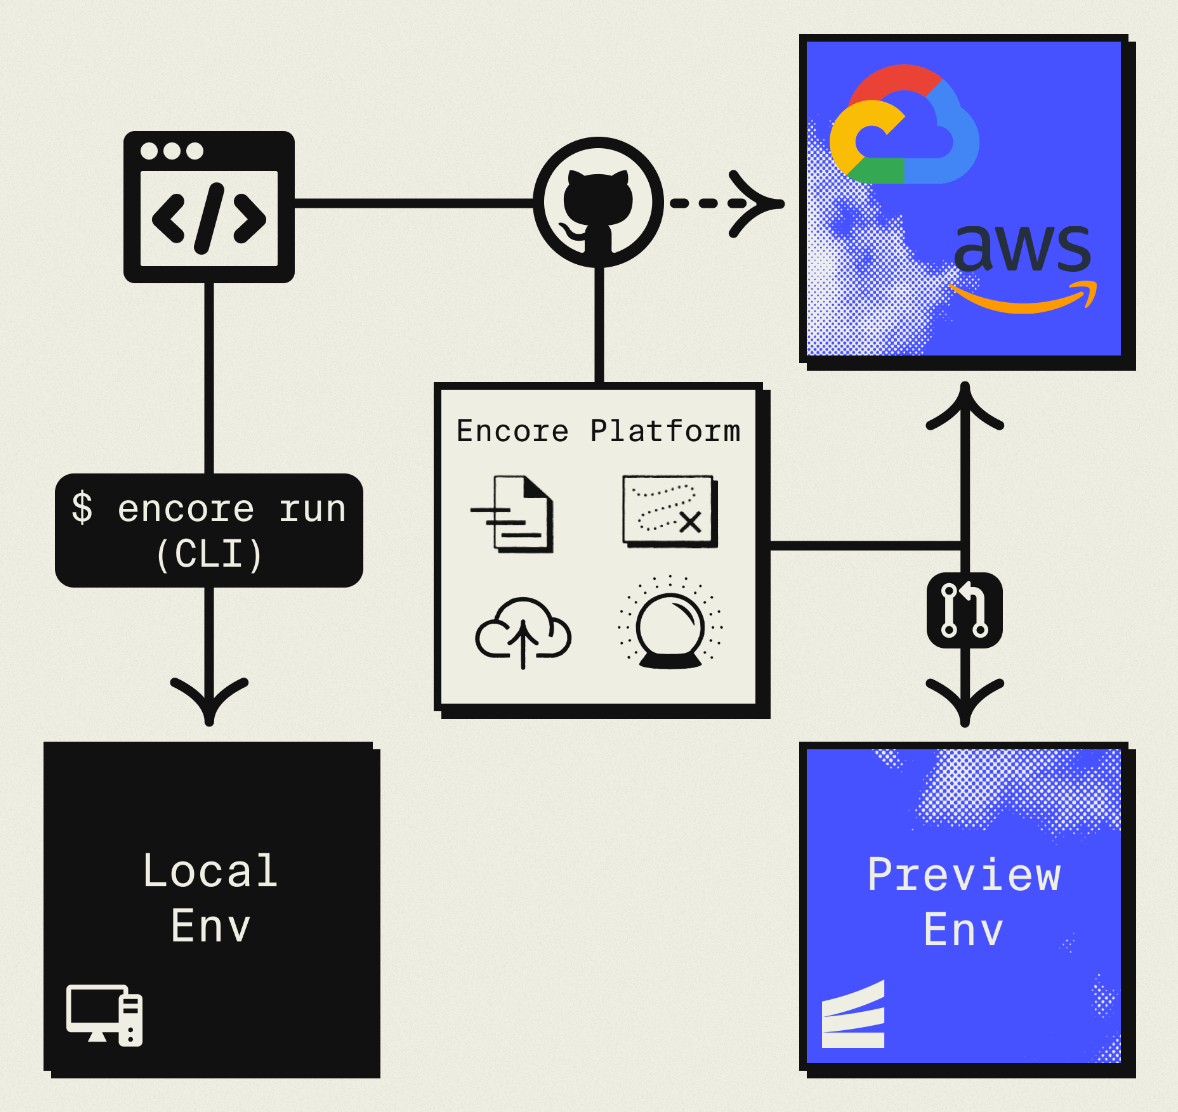
The result is AWS infrastructure you own and control, but with a developer experience that's comparable to Vercel: push code, get a deployment. You don't need to learn Terraform or maintain YAML. Companies like Groupon already use this approach to power their backends at scale.
Your frontend can stay on Vercel. This guide is about moving the backend.
What You're Migrating
| Vercel Component | AWS Equivalent (via Encore) |
|---|---|
| API Routes / Serverless Functions | Fargate |
| Edge Functions | Fargate (or keep on Vercel for edge logic) |
| Vercel Postgres (Neon) | Amazon RDS PostgreSQL |
| Vercel KV (Redis) | SNS/SQS for queues, ElastiCache for cache |
| Vercel Blob | Amazon S3 |
| Cron Jobs | CloudWatch Events + Fargate |
The API routes are the main migration. Database, storage, and cron follow naturally.
Why Teams Migrate Their Backend Off Vercel
Infrastructure ownership: Vercel manages your infrastructure in their AWS account. You can't access the underlying resources, configure VPCs, set up IAM roles, or peer networks with your existing infrastructure. For teams that need to control their cloud environment or meet compliance requirements that mandate infrastructure in accounts you own, this is a blocker.
Cost transparency: Vercel's pricing includes a markup over the underlying AWS costs. Their Fluid Compute uses Active CPU pricing starting at $0.128/hour, and as backend workloads scale, the difference between Vercel's rates and what you'd pay running the same compute on your own AWS account becomes meaningful. With reserved instances and savings plans on AWS, the gap widens further.
Platform coupling: Each Vercel service you adopt (Postgres, KV, Blob, Queues) adds another integration point that's specific to their platform. Their SDKs, their connection pooling, their dashboard for environment variables. Migrating one service is manageable. Migrating five after a year of development is a project.
Dependency on Vercel's roadmap: Your backend capabilities are limited to what Vercel decides to build and expose. Vercel Queues just entered public beta. Durable workflows are new. If you need a feature they haven't shipped yet, you either wait or bolt on an external service. On your own AWS account, every AWS service is available to you immediately.
Compliance scope: Having a third party provision and manage infrastructure on your behalf adds complexity to SOC 2, HIPAA, and other audits. Running infrastructure in your own AWS account with your own IAM policies simplifies that scope.
What Encore Handles For You
When you deploy to AWS through Encore Cloud, every resource gets production defaults: private VPC placement, least-privilege IAM roles, encryption at rest, automated backups where applicable, and CloudWatch logging. You don't configure this per resource. It's automatic.
Encore follows AWS best practices and gives you guardrails. You can review infrastructure changes before they're applied, and everything runs in your own AWS account so you maintain full control.
Here's what that looks like in practice:
import { SQLDatabase } from "encore.dev/storage/sqldb";
import { Bucket } from "encore.dev/storage/objects";
import { Topic } from "encore.dev/pubsub";
import { CronJob } from "encore.dev/cron";

const db = new SQLDatabase("main", { migrations: "./migrations" });
const uploads = new Bucket("uploads", { versioned: false });
const events = new Topic<OrderEvent>("events", { deliveryGuarantee: "at-least-once" });
const _ = new CronJob("daily-cleanup", { schedule: "0 0 * * *", endpoint: cleanup });
This provisions RDS, S3, SNS/SQS, and CloudWatch Events with proper networking, IAM, and monitoring. You write TypeScript or Go, Encore handles the Terraform. The only Encore-specific parts are the import statements. Your business logic is standard TypeScript, so you're not locked in.
See the infrastructure primitives docs for the full list of supported resources.
Step 1: Migrate API Routes
Vercel API routes live in app/api/ (App Router) or pages/api/ (Pages Router). Each file exports HTTP method handlers. With Encore, each endpoint is a typed function.
Before (Next.js API Route):
// app/api/users/[id]/route.ts
import { NextResponse } from "next/server";
import { db } from "@/lib/db";

export async function GET(
  request: Request,
  { params }: { params: { id: string } }
) {
  const user = await db.query("SELECT * FROM users WHERE id = $1", [params.id]);

  if (!user.rows[0]) {
    return NextResponse.json({ error: "Not found" }, { status: 404 });
  }

  return NextResponse.json(user.rows[0]);
}
After (Encore API):
import { api, APIError } from "encore.dev/api";
import { SQLDatabase } from "encore.dev/storage/sqldb";

const db = new SQLDatabase("main", { migrations: "./migrations" });

interface User {
  id: string;
  email: string;
  name: string;
  createdAt: Date;
}

export const getUser = api(
  { method: "GET", path: "/users/:id", expose: true },
  async ({ id }: { id: string }): Promise<User> => {
    const user = await db.queryRow<User>`
      SELECT id, email, name, created_at as "createdAt"
      FROM users
      WHERE id = ${id}
    `;

    if (!user) {
      throw APIError.notFound("User not found");
    }

    return user;
  }
);
The main differences:
- Request/response types are declared explicitly — no manual JSON parsing or
NextResponsewrapping - Errors use typed exceptions instead of status code responses
- The database connection is declared in code, not pulled from an environment variable
- Path parameters are type-safe and extracted automatically
Migrating Multiple Routes
If you have many API routes, create separate Encore services for logical groups:
// users/encore.service.ts
import { Service } from "encore.dev/service";
export default new Service("users");

// payments/encore.service.ts
import { Service } from "encore.dev/service";
export default new Service("payments");
Services can call each other with type-safe imports:
import { users } from "~encore/clients";

// Call the users service from payments
const user = await users.getUser({ id: order.userId });
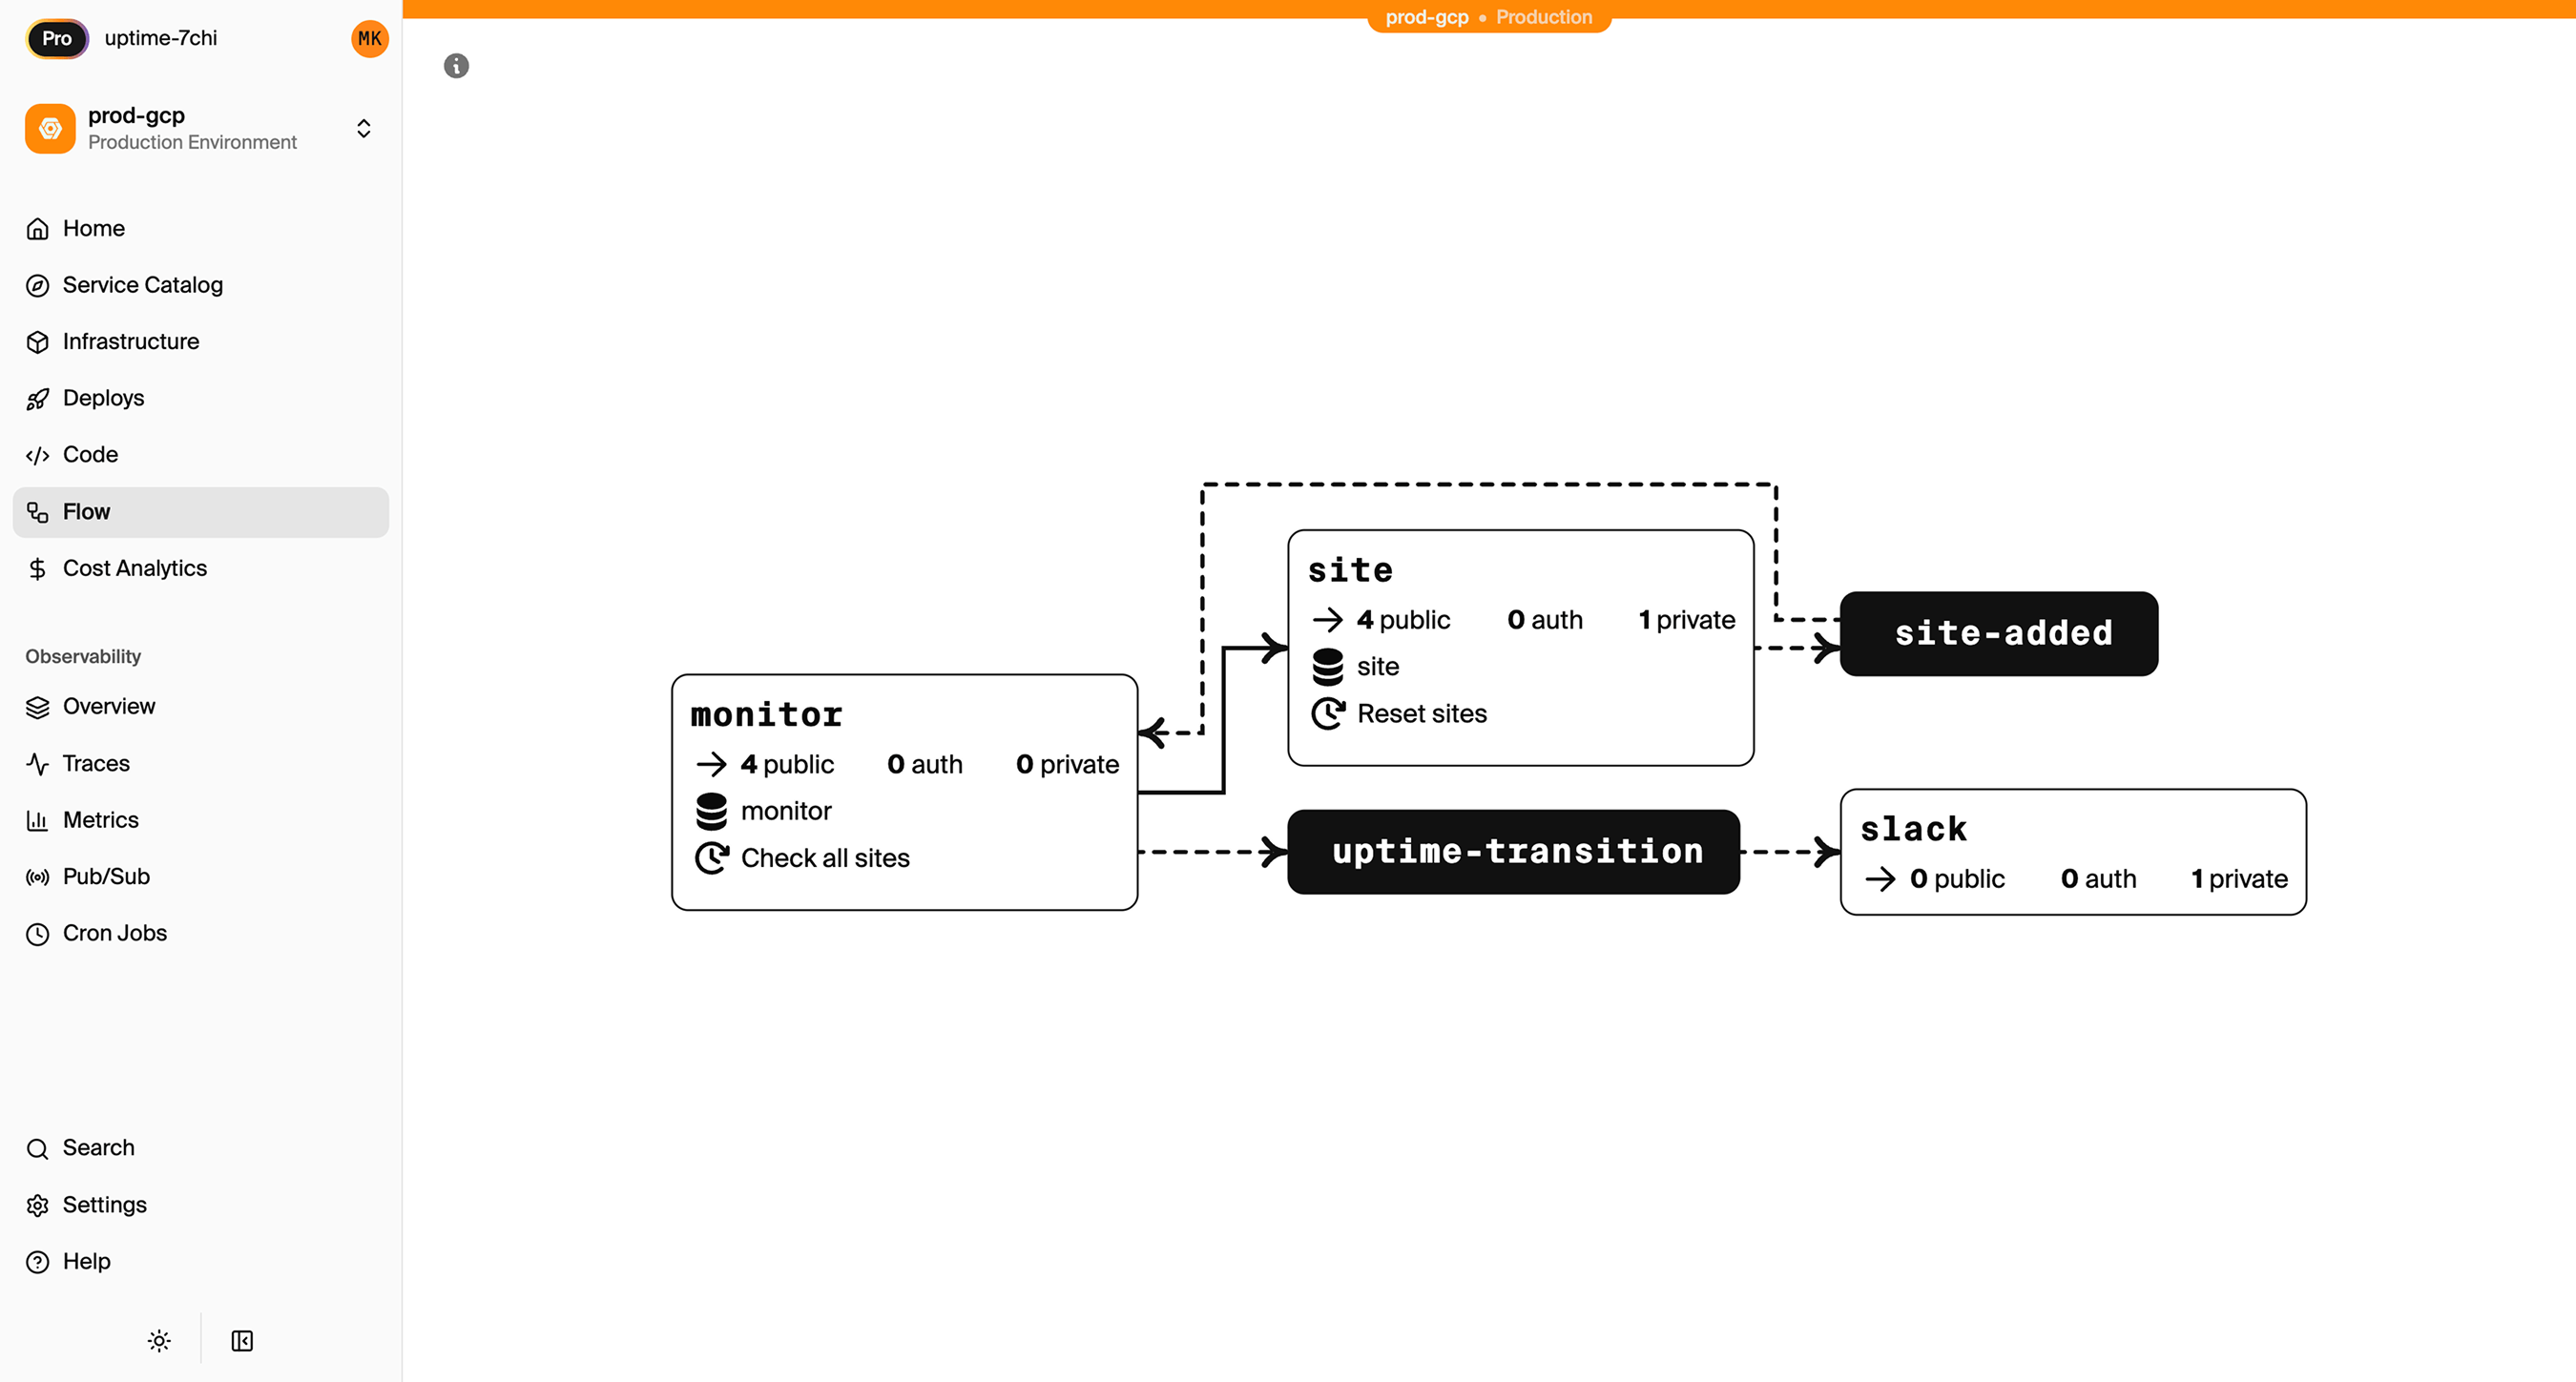
Inter-service calls get compile-time type checking and automatic distributed tracing. Encore Cloud visualizes how your services connect, including Pub/Sub topics, cron jobs, and database dependencies:
Middleware
If you use Next.js middleware for auth, rate limiting, or request transformation, Encore has an equivalent. Middleware is defined as part of a service:
import { middleware } from "encore.dev/api";
import { Service } from "encore.dev/service";

export default new Service("api", {
  middlewares: [
    middleware(async (req, next) => {
      const start = Date.now();
      const resp = await next(req);
      console.log(`Request took ${Date.now() - start}ms`);
      return resp;
    }),
  ],
});
Step 2: Migrate the Database
If you're using Vercel Postgres (powered by Neon), you're already on PostgreSQL. The migration is straightforward.
Export from Vercel Postgres
Get your connection string from the Vercel dashboard (Storage > your database > .env.local tab), then export:
pg_dump "postgresql://user:pass@ep-xxxx.us-east-2.aws.neon.tech/neondb" > backup.sql
Set Up the Encore Database
import { SQLDatabase } from "encore.dev/storage/sqldb";

const db = new SQLDatabase("main", {
  migrations: "./migrations",
});
That's the complete database definition. Encore analyzes this at compile time and provisions RDS PostgreSQL when you deploy.
Put your existing migration files in ./migrations. Encore expects files named like 001_create_users.up.sql, 002_add_posts.up.sql. If you were using Drizzle or Prisma migrations with Vercel, you may need to convert them to plain SQL files.
Import to RDS
After your first Encore deploy to AWS:
# Get the production connection string
encore db conn-uri main --env=production

# Import your data
psql "postgresql://user:pass@your-rds.amazonaws.com:5432/main" < backup.sql
ORM Compatibility
If you were using Drizzle or Prisma with Vercel Postgres, they work with Encore too. The connection is handled automatically — you don't need to configure a DATABASE_URL environment variable.
Step 3: Migrate Vercel KV
Vercel KV is a managed Redis instance. The migration path depends on what you're using it for.
For Rate Limiting or Session Storage
If you're using KV for rate limiting or sessions, Encore's database handles this well:
// Simple rate limiter using the database
export const checkRateLimit = api(
  { method: "POST", path: "/internal/rate-check" },
  async ({ key, limit, windowSeconds }: {
    key: string;
    limit: number;
    windowSeconds: number;
  }): Promise<{ allowed: boolean; remaining: number }> => {
    const result = await db.queryRow<{ count: number }>`
      SELECT count(*)::int as count
      FROM rate_limits
      WHERE key = ${key}
      AND created_at > NOW() - make_interval(secs => ${windowSeconds})
    `;

    if ((result?.count ?? 0) >= limit) {
      return { allowed: false, remaining: 0 };
    }

    await db.exec`INSERT INTO rate_limits (key) VALUES (${key})`;
    return { allowed: true, remaining: limit - (result?.count ?? 0) - 1 };
  }
);
For Job Queues: Use Pub/Sub
If you're using KV with BullMQ or similar queue patterns:
Before (Vercel KV with BullMQ):
import { Queue, Worker } from "bullmq";
import { kv } from "@vercel/kv";

const emailQueue = new Queue("email", { connection: kv });

await emailQueue.add("welcome", { to: "user@example.com" });
After (Encore Pub/Sub):
import { Topic, Subscription } from "encore.dev/pubsub";

interface EmailJob {
  to: string;
  subject: string;
  body: string;
}

export const emailQueue = new Topic<EmailJob>("email-queue", {
  deliveryGuarantee: "at-least-once",
});

// Publish
await emailQueue.publish({
  to: "user@example.com",
  subject: "Welcome",
  body: "Thanks for signing up!",
});

// Process (runs automatically when messages arrive)
const _ = new Subscription(emailQueue, "send-emails", {
  handler: async (job) => {
    await sendEmail(job.to, job.subject, job.body);
  },
});
On AWS, this provisions SNS/SQS with dead-letter queues and retry policies. No Redis needed.
For Caching: Use Encore Cache
Encore has built-in type-safe caching:
import { CacheCluster, StructKeyspace, expireInHours } from "encore.dev/storage/cache";

const cluster = new CacheCluster("main", { evictionPolicy: "allkeys-lru" });

interface UserProfile {
  name: string;
  email: string;
  avatarUrl: string;
}

const profileCache = new StructKeyspace<{ id: string }, UserProfile>(cluster, {
  keyPattern: "profile/:id",
  defaultExpiry: expireInHours(1),
});

// Use the cache
const cached = await profileCache.get({ id: "user-123" });
if (!cached) {
  const profile = await fetchFromDatabase("user-123");
  await profileCache.set({ id: "user-123" }, profile);
}
Step 4: Migrate Vercel Blob
Vercel Blob storage becomes S3:
Before (Vercel Blob):
import { put, del } from "@vercel/blob";

const blob = await put("avatars/user-123.jpg", file, {
  access: "public",
  contentType: "image/jpeg",
});
After (Encore Object Storage):
import { Bucket } from "encore.dev/storage/objects";

const avatars = new Bucket("avatars", {
  versioned: false,
  public: true,
});

export const uploadAvatar = api(
  { method: "POST", path: "/avatars/:userId", expose: true, auth: true },
  async ({ userId, data, contentType }: {
    userId: string;
    data: Buffer;
    contentType: string;
  }): Promise<{ url: string }> => {
    const key = `${userId}.jpg`;
    await avatars.upload(key, data, { contentType });
    return { url: avatars.publicUrl(key) };
  }
);

export const deleteAvatar = api(
  { method: "DELETE", path: "/avatars/:userId", expose: true, auth: true },
  async ({ userId }: { userId: string }): Promise<{ deleted: boolean }> => {
    await avatars.remove(`${userId}.jpg`);
    return { deleted: true };
  }
);
Migrate Existing Files
Download from Vercel Blob and upload to S3 after your first Encore deploy:
# Use the Vercel CLI to list and download blobs, then upload to S3
aws s3 sync ./blob-backup s3://your-encore-bucket
Step 5: Migrate Cron Jobs
Vercel cron jobs are defined in vercel.json. With Encore, they're defined in code next to the function they trigger:
Before (vercel.json):
{
  "crons": [
    {
      "path": "/api/cleanup",
      "schedule": "0 2 * * *"
    }
  ]
}
After (Encore):
import { CronJob } from "encore.dev/cron";
import { api } from "encore.dev/api";

export const cleanup = api(
  { method: "POST", path: "/internal/cleanup" },
  async (): Promise<{ deleted: number }> => {
    const result = await db.exec`
      DELETE FROM sessions WHERE expires_at < NOW()
    `;
    return { deleted: result.rowsAffected };
  }
);

const _ = new CronJob("daily-cleanup", {
  title: "Clean up expired sessions",
  schedule: "0 2 * * *",
  endpoint: cleanup,
});
With Encore, the cron declaration lives next to the code it runs. On AWS, this provisions CloudWatch Events to trigger your Fargate service.
Step 6: Update Your Frontend
Your Next.js frontend stays on Vercel. Update the API calls to point to your new Encore backend:
// Before: relative API route
const res = await fetch("/api/users");

// After: Encore backend URL
const res = await fetch("https://api.yourapp.com/users");
Encore can also generate a type-safe client for your frontend:
encore gen client <app-id> --output=./src/lib/client.ts
import Client from "./src/lib/client";

const client = new Client("https://api.yourapp.com");
const user = await client.users.getUser({ id: "123" });
CORS Configuration
Since your frontend and backend are now on different domains, configure CORS in your encore.app file:
{
  "global_cors": {
    "allow_origins_with_credentials": [
      "https://yourapp.vercel.app",
      "https://yourapp.com"
    ]
  }
}
Step 7: Deploy to AWS
-
Connect your AWS account in the Encore Cloud dashboard. You'll set up an IAM role that gives Encore permission to provision resources. See the AWS setup guide for details.
-
Push your code:
git push encore main -
Run data migrations (database import, file sync)
-
Test in preview environment. Each pull request gets its own environment — something Vercel does for frontends, but now you have it for your backend too.
-
Update your frontend to use the new API URL
-
Update DNS if using a custom domain for the API
What Gets Provisioned
Encore creates in your AWS account:
- Fargate for running your APIs (no cold starts)
- RDS PostgreSQL for your database
- S3 for object storage
- SNS/SQS for Pub/Sub messaging
- CloudWatch Events for cron scheduling
- Application Load Balancer for HTTP routing
- CloudWatch Logs for application logs
- IAM roles with least-privilege access
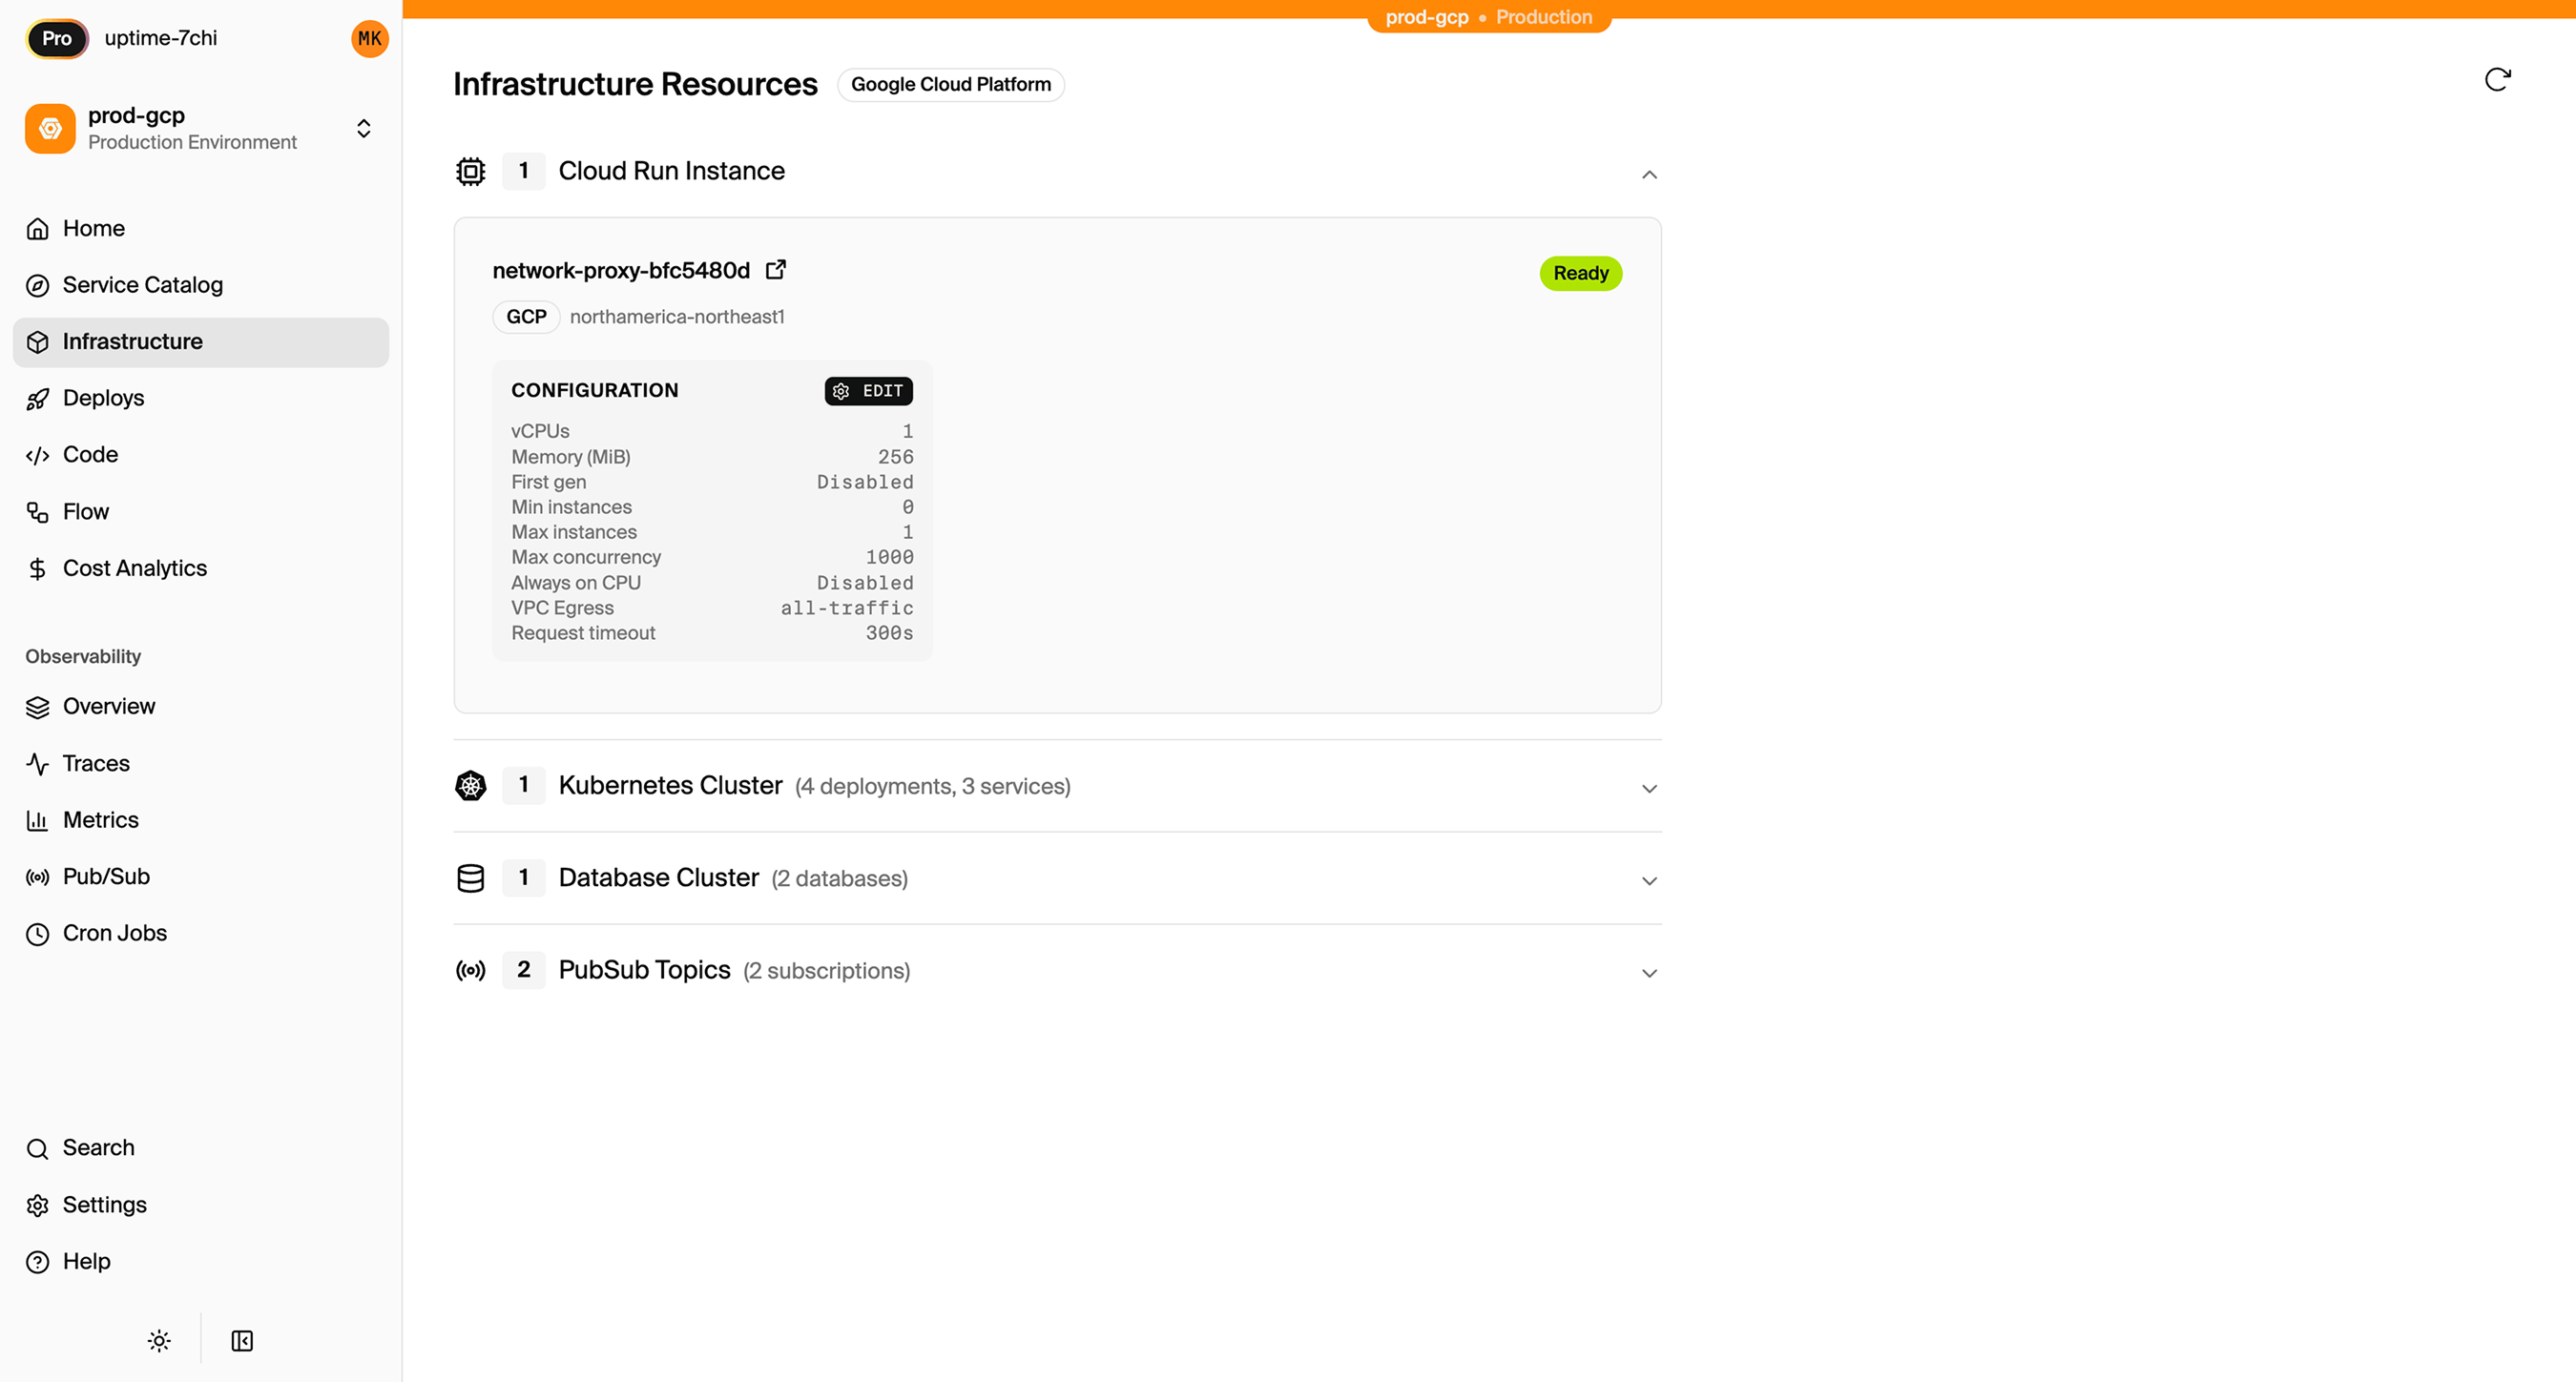
You can view and manage these resources directly in the AWS console. Encore Cloud also gives you a dashboard showing all provisioned infrastructure across environments:
What You Gain
The migration gives you infrastructure ownership with a comparable developer experience:
- Your AWS account: VPCs, security groups, IAM roles, billing. You can access every resource in the AWS console, connect to RDS directly, and integrate with any AWS service.
- AWS pricing: No markup. Use reserved instances, savings plans, and volume discounts.
- Persistent compute: APIs run on Fargate with no cold starts and no function timeouts.
- Microservices: Split your backend into services with type-safe inter-service calls and automatic distributed tracing.
- Full AWS ecosystem: SQS, SNS, DynamoDB, Lambda@Edge, Step Functions. Whatever you need is available in your account.
- Simplified compliance: Infrastructure in your account, your IAM policies, your audit trail.
Migration Checklist
- Identify all API routes and serverless functions
- Create Encore app with service structure
- Migrate API routes to Encore endpoints
- Export Vercel Postgres database
- Set up Encore database with migrations
- Import data to RDS after first deploy
- Migrate Vercel KV usage (cache, queues, sessions)
- Migrate Vercel Blob files to S3
- Convert vercel.json cron jobs to CronJob
- Update frontend API calls to new backend URL
- Configure CORS for frontend domain
- Test in preview environment
- Update DNS
- Monitor for issues
Wrapping Up
Vercel is building real backend capabilities, and for many teams the convenience is worth the trade-off. But if you need infrastructure you own, pricing you control, and a compliance scope that doesn't include a third party managing your cloud resources, running on your own AWS account is the straightforward answer.
Encore handles the AWS provisioning so you're not trading Vercel's abstraction for Terraform's complexity. You get infrastructure in your account, managed through your code, with a developer experience that keeps you moving fast.
Try deploying a TypeScript backend to your own AWS account:
Want to jump straight to a running app? Clone this starter and deploy it to your own cloud.